In this tutorial, I will guide you through the essential steps to set up the Automation Gateway, harness the power of YAML extensions in Visual Studio Code for configuration, and connect various devices, including OPC UA, MQTT, and PLC4X devices. I will show how to integrate the values from the devices to the Gateway’s OPC UA server and how to use the MQTT interface to get the values from the devices via a MQTT client. Additionally values from the connected devices will be logged to a Influx database.
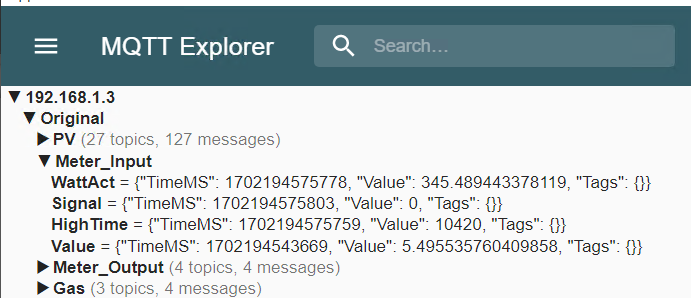
I wanted to get my Home-Automation values to SCADA, it’s a “self-made” JSON message format. I tried it with Ignition and the MQTT Module. Btw.: it’s great that they have the Makers Edition for non-commercial use at home 👍. But I don’t know why, it only got one topic and one value from my MQTT Broker, and it did not receive any updates. Don’t know what went wrong…
Anyhow, I decided to add a custom JSON format to the Automation-Gateway.com. It’s simple, just define the JSON-Path to the value and optionally to a timestamp in milliseconds since epoch or to an ISO 8601 format.
Now I can use the Automation-Gateway’s OPC UA server in any SCADA system to visualize my MQTT values…
Here is the config.yaml configuration file for the Automation-Gateway.
“MQTT for Unity” is a Unity Package designed to seamlessly integrate MQTT (Message Queuing Telemetry Transport) functionality into Unity projects, offering a user-friendly solution for enabling real-time communication and data exchange within Unity applications.
Tested on Windows, OSX, WebGL, UWP + HoloLens2, and Android. iOS not tested, but should work as well.
Streamlined Integration: “MQTT for Unity” provides a straightforward and hassle-free integration process, enabling developers to quickly set up MQTT communication in their Unity projects.
Real-Time Communication: Harness the power of MQTT to establish real-time communication channels within your Unity application, perfect for multiplayer games, IoT applications, and more.
Customizable Configuration: Easily configure MQTT parameters, such as broker settings, topic subscriptions, and message handling, to tailor the communication to your specific project needs.
Cross-Platform Compatibility: “MQTT for Unity” is designed to work seamlessly across various Unity-supported platforms, including Windows, OSX, WebGL, UWP + HoloLens2, and Android. iOS not tested, but should work as well.
With “MQTT for Unity,” developers can unlock the potential of MQTT communication in their Unity applications without the complexities of manual integration, making it an essential tool for creating interactive and connected experiences in Unity.
The integration of SCADA with Spark and WinCC Open Architecture offers a powerful and versatile solution that combines real-time data processing, advanced analytics, scalability, and flexibility. This combination empowers you to optimize industrial processes, make data-driven decisions, and stay ahead in a rapidly evolving technological landscape.
By utilizing my 5-year-old project that implemented a native Java manager for WinCC Open Architecture, I have enabled the integration of SCADA with Spark for the current WinCC OA Version 3.19.
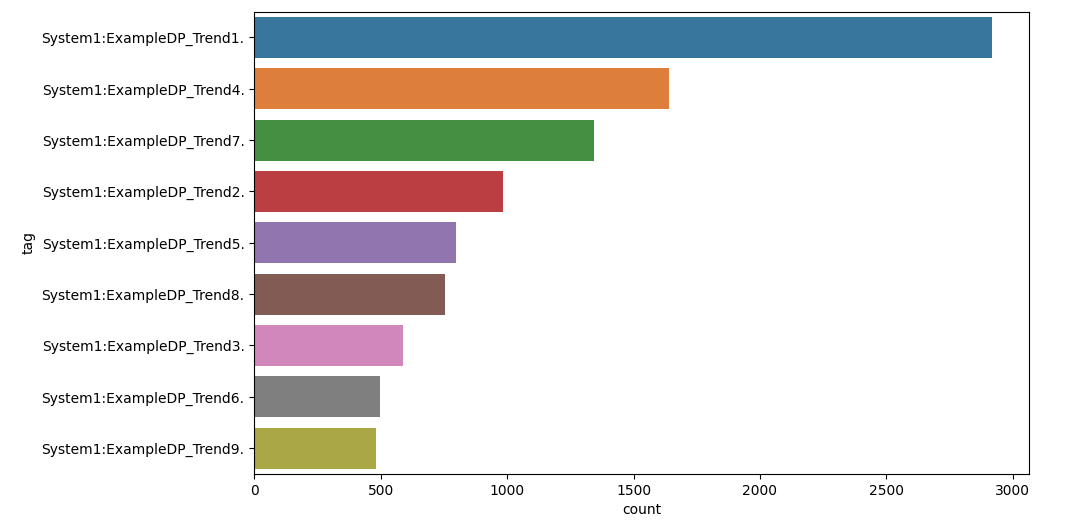
Very simple example is to analyze tags and the corresponding amount of values in your SCADA system can provide valuable insights into the distribution and characteristics of the data.
res = spark.sql('SELECT tag, count(*) count FROM events GROUP BY tag ORDER by count(*) DESC')
data = res.toPandas()
plt.figure( figsize = ( 10, 6 ) )
sns.barplot( x="count", y="tag", data=data)
plt.show()
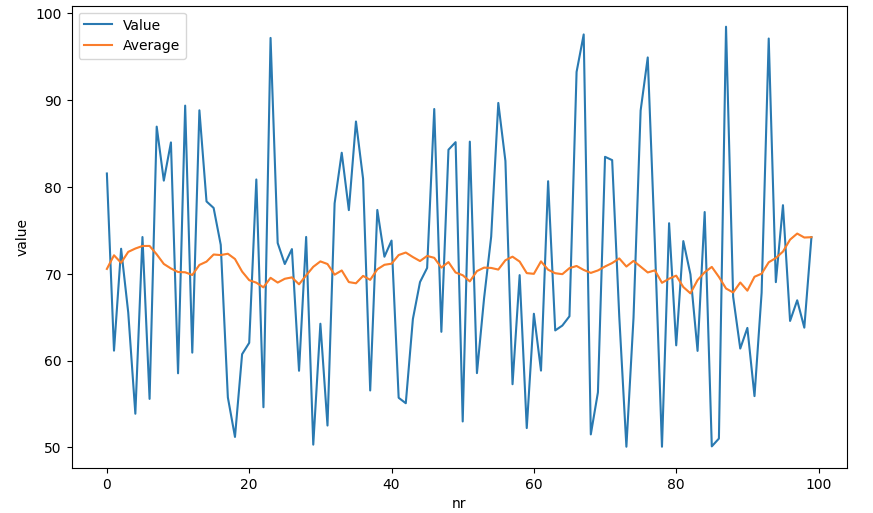
Another simple example is to calculate the moving average of 10 preceding and following values for a given data point in a time series, you can use a sliding window approach:
data = spark.sql("""
SELECT ROUND(value,2) as value,
  AVG(value) OVER (PARTITION BY tag ORDER BY ts
  ROWS BETWEEN 10 PRECEDING AND 10 FOLLOWING) avg
  FROM events
  WHERE tag = 'System1:ExampleDP_Trend2.'
  ORDER BY ts DESC
  LIMIT 100
  """).toPandas()
data = data.reset_index().rename(columns={"index": "nr"})
sns.lineplot(data=data, x='nr', y='value', label='Value')
sns.lineplot(data=data, x='nr', y='avg', label='Average')
plt.show()
By leveraging the distributed file system, you can take advantage of Spark’s parallel processing capabilities. The distributed file system ensures that the data frame is partitioned and distributed across the nodes of the Spark cluster, enabling simultaneous processing of data in parallel. This distributed approach enhances performance and scalability, allowing for efficient handling of large volumes of real-time SCADA data.
I have achieved real-time data streaming from WinCC OA to a Spark cluster with a Websocket-Server based on the Java manager. This streaming process involves continuouslytransferring SCADA real-time data from the WinCC OA system to the Spark cluster for further processing and analysis.
Once the data is received by the Spark cluster, I store it as a data frame on the distributed file system (DFS). A data frame is a distributed collection of data organized into named columns, similar to a table in a relational database. Storing the data frame on the distributed file system ensures data persistence and allows for efficient processing and retrieval.
bulk = []
last = datetime.datetime.now()
def on_message(message):
    global bulk, last, start
    data = json.loads(message)

    if "DpQueryConnectResult" in data:
        values = data["DpQueryConnectResult"]["Values"]
        for tag, value in values:
            #print(tag, value)
            data = {"ts": datetime.datetime.now(), "tag": tag, "value": value}
            bulk.append(data)

    now =datetime.datetime.now()
    time = datetime.datetime.now() - last
    if time.total_seconds() > 10 or len(bulk) >= 1000:
        last = now

        # Create a new DataFrame with the received data
        new_df = spark.createDataFrame(bulk, schema)

        new_df.write \
            .format("csv") \
            .option("header", "true") \
            .mode("append") \
            .save("events.csv")

        bulk = []
Once the SCADA data is stored as a distributed data frame on the Spark cluster’s distributed file system, you can leverage Spark’s parallel processing capabilities to efficiently process the data in parallel.
By combining SCADA (Supervisory Control and Data Acquisition) with Spark’s powerful data processing capabilities, I have created a solution that can handle large volumes of real-time data efficiently. This enables faster and more accurate decision-making based on the insights derived from the processed data.
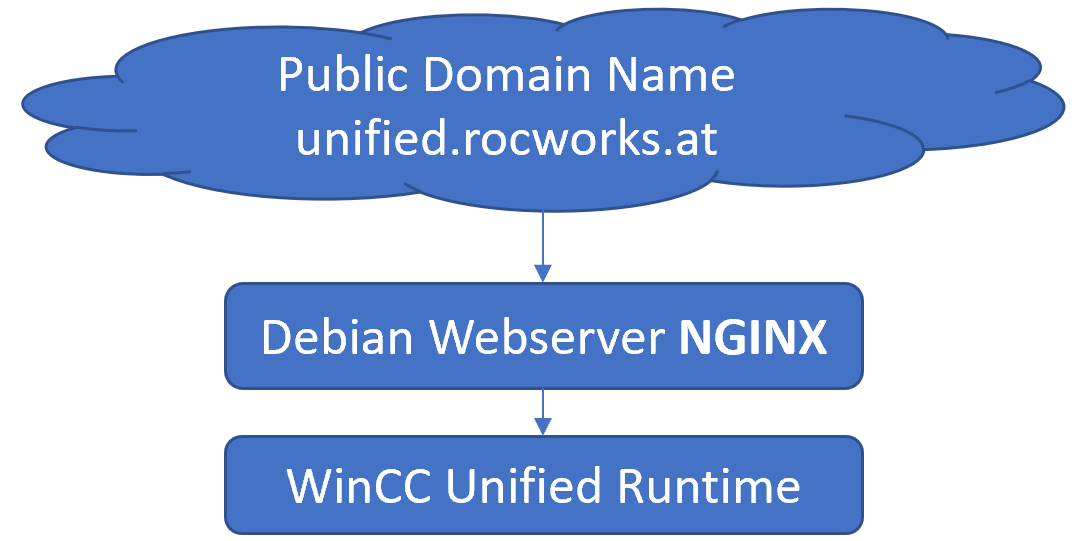
This article will show how WinCC Unified can be accessed through a public available server in the internet.
Disclaimer: I only did this for testing and demo purposes!!!
First you need to have a public domain name and a public accessible host. Or a host running somewhere in the cloud and you will get a IP and/or an URL, which will point to your host. In my case I have a public IP address from my internet provider and my public sub domain name points to my server at home.
My registered public domain name is rocworks.at. Additionally I have used a sub-domain name unified.rocworks.at. Because I have multiple services running on my machine at home. With the subdomain the service can be easily be distinguished. At my internet provider I have configured a DDNS services, so that my subdomain unified.rocworks.at points to my IP at home. You can also use other DDNS services (noip.com) , also if you have a dynamic IP address.
If you have it running at home, then you have to setup a port forwarding from your modem to your web server IP at home.
At the WinCC Unified Runtime Host we have to change some settings in files, to set the right public URL for the identity provider (UMC). After doing this, you should reboot the computer.
Config.level (C:\Program Files\Siemens\Automation\WinCCUnified\config)

	[IdentityProvider]
	Url = "https://unified.rocworks.at/umc-sso/"

Web.config (C:\Program Files\Siemens\Automation\WinCCUnified\WebRH)

	<appSettings>
	    <add key="appvirtdir" value="/WebRH" />
	    <add key="origins" value="https://unified.rocworks.at" />
	  </appSettings>

Config.json (C:\Program Files\Siemens\Automation\WinCCUnified\SimaticUA)

        "dnsname": "unified.rocworks.at"

Umcd.cfg (C:\Program Files\Siemens\LocalUserManagement\etc)

	Search and replace hostnames

HKEY_LOCAL_MACHINE\SOFTWARE\Siemens\User Management\WebUI\Settings

        ipaddress = "https://unified.rocworks.at/umc-sso/"

Note: instead of "unified.rocworks.at" use your public domain name.
At the web server at home I have NGINX running in a Docker Container together with Let’s Encrypt. With Let’s Encrypt and Certbot we can get valid Certificates for our Webserver. But that’s another story. Here is a docker-compose.yml file for NGINX and Let’s Encrypt:
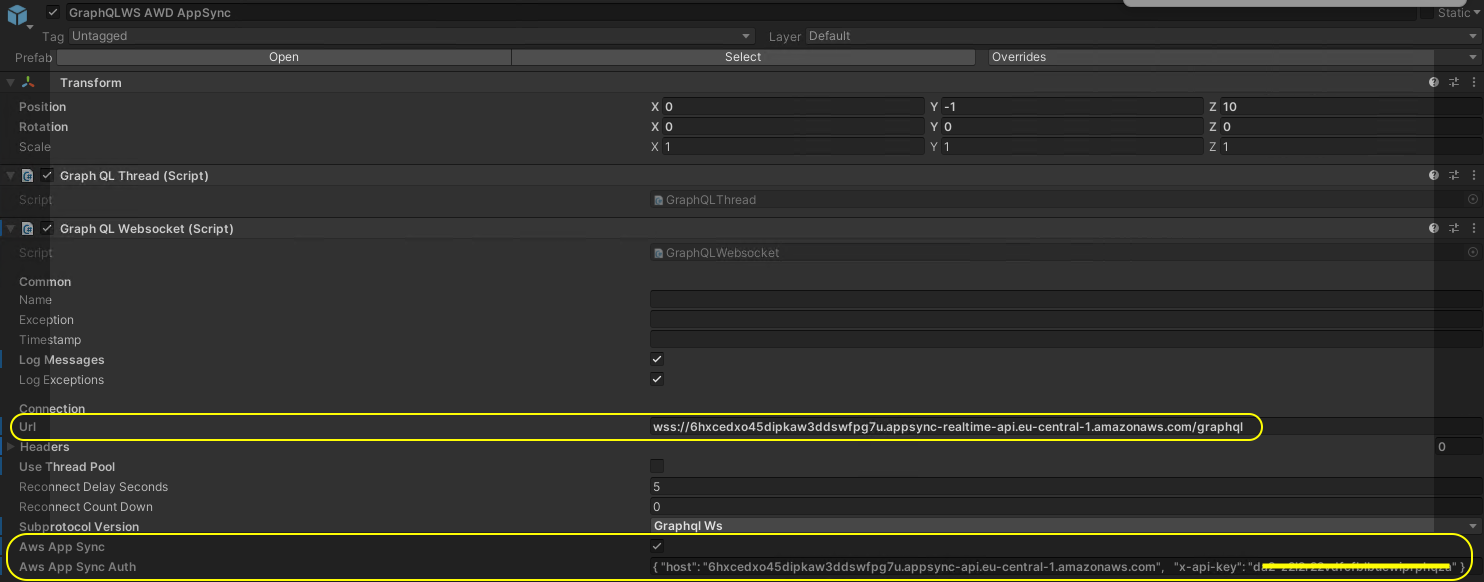
The Asset GraphQL for Unity version 1.5.2 works now with AWS AppSync realtime Websocket connections. You can now subscribe to real-time value changes via a GraphQL Websocket connection with AWS AppSync. This was not possible before, because AWS has implemented it’s own specific protocol which is a little bit different to the Apollo Websocket protocol.
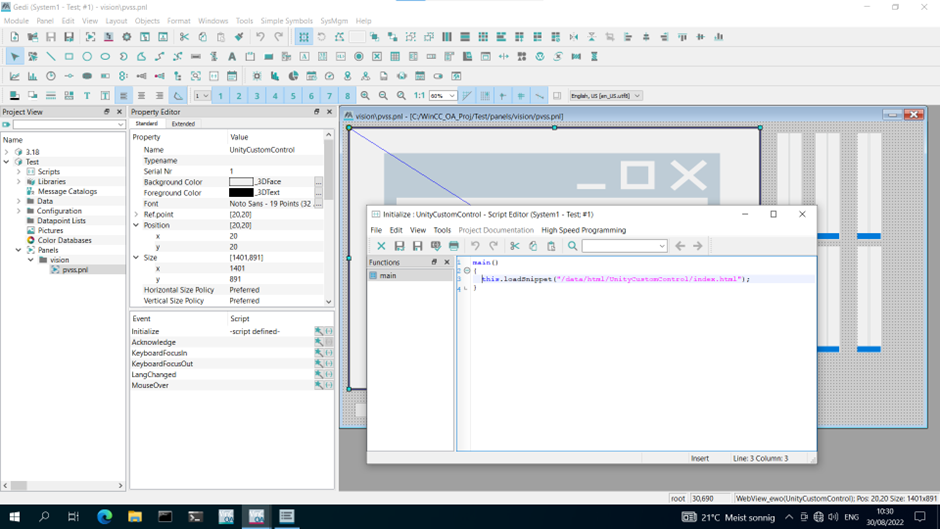
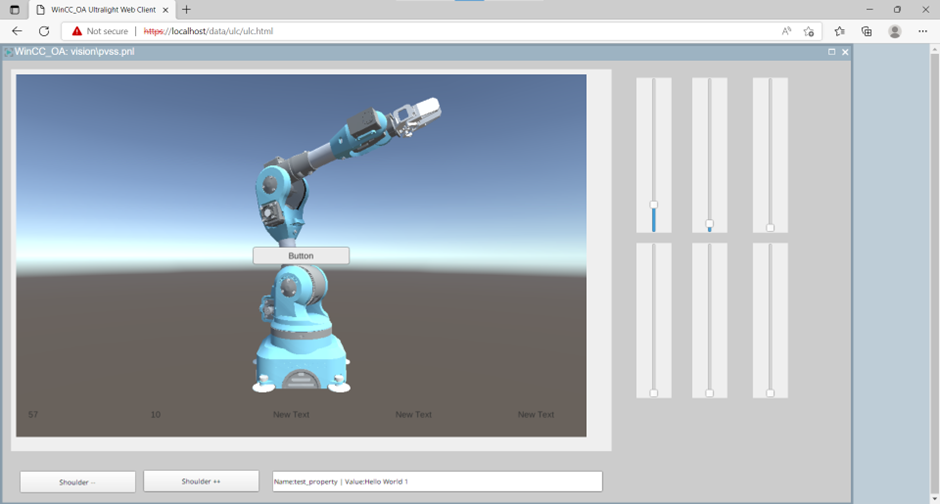
This article is about integrating your 3D Unity applications into WinCC Open Architecture SCADA HMI Web screens and exchanging property values. It only works with the WinCC Ultralight Web Client. Because the native Ui does not support WebGL in the WebView Widget. Update: It should also work in the native Ui, you just have to set the environment variable: QTWEBENGINE_CHROMIUM_FLAGS=–enable-gpu
With this free Unity Asset you can create a Unity application with an interface to the SCADA system in an easy way. Don’t be confused about the name of the Asset “WinCC Unified Custom Web Control”. This is because initially it was build to create Custom Web Controls for WinCC Unified only. But there is now also an option to create a build of your Unity application for WinCC Open Architecture.
First create and build your Unity Application as described in the documentation of the Asset. You may also watch this video.
Just at the end execute the menu item to create a WinCC Open Architecture application, instead of WinCC Unified.
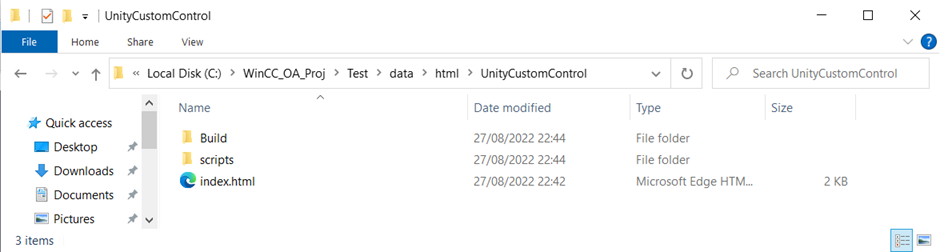
Create and load the WebView
Then copy the ZIP file to your WinCC OA project into the folder “data\html” and unzip the ZIP (for example C:\WinCC_OA_Proj\Test\data\html\UnityCustomControl).
In this tutorial our application is named “UnityCustomControl”. You have to replace this with the name of your Unity application.
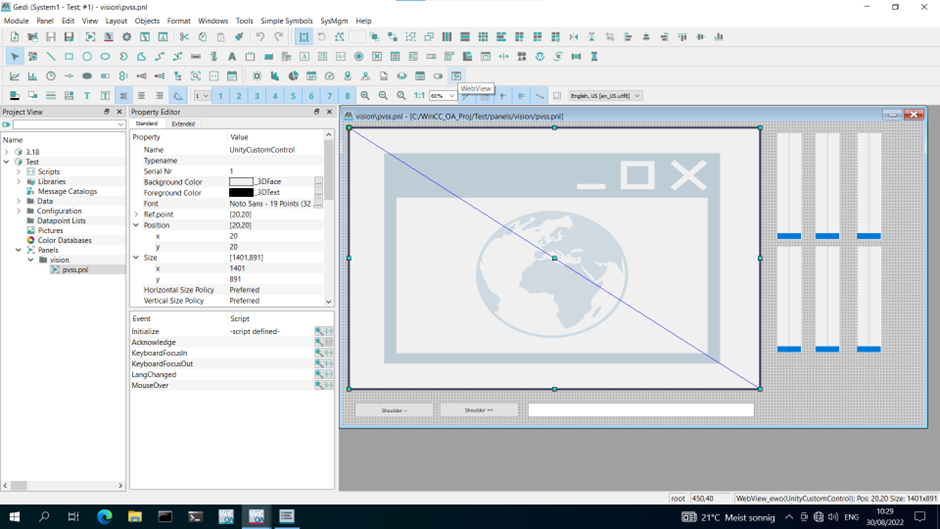
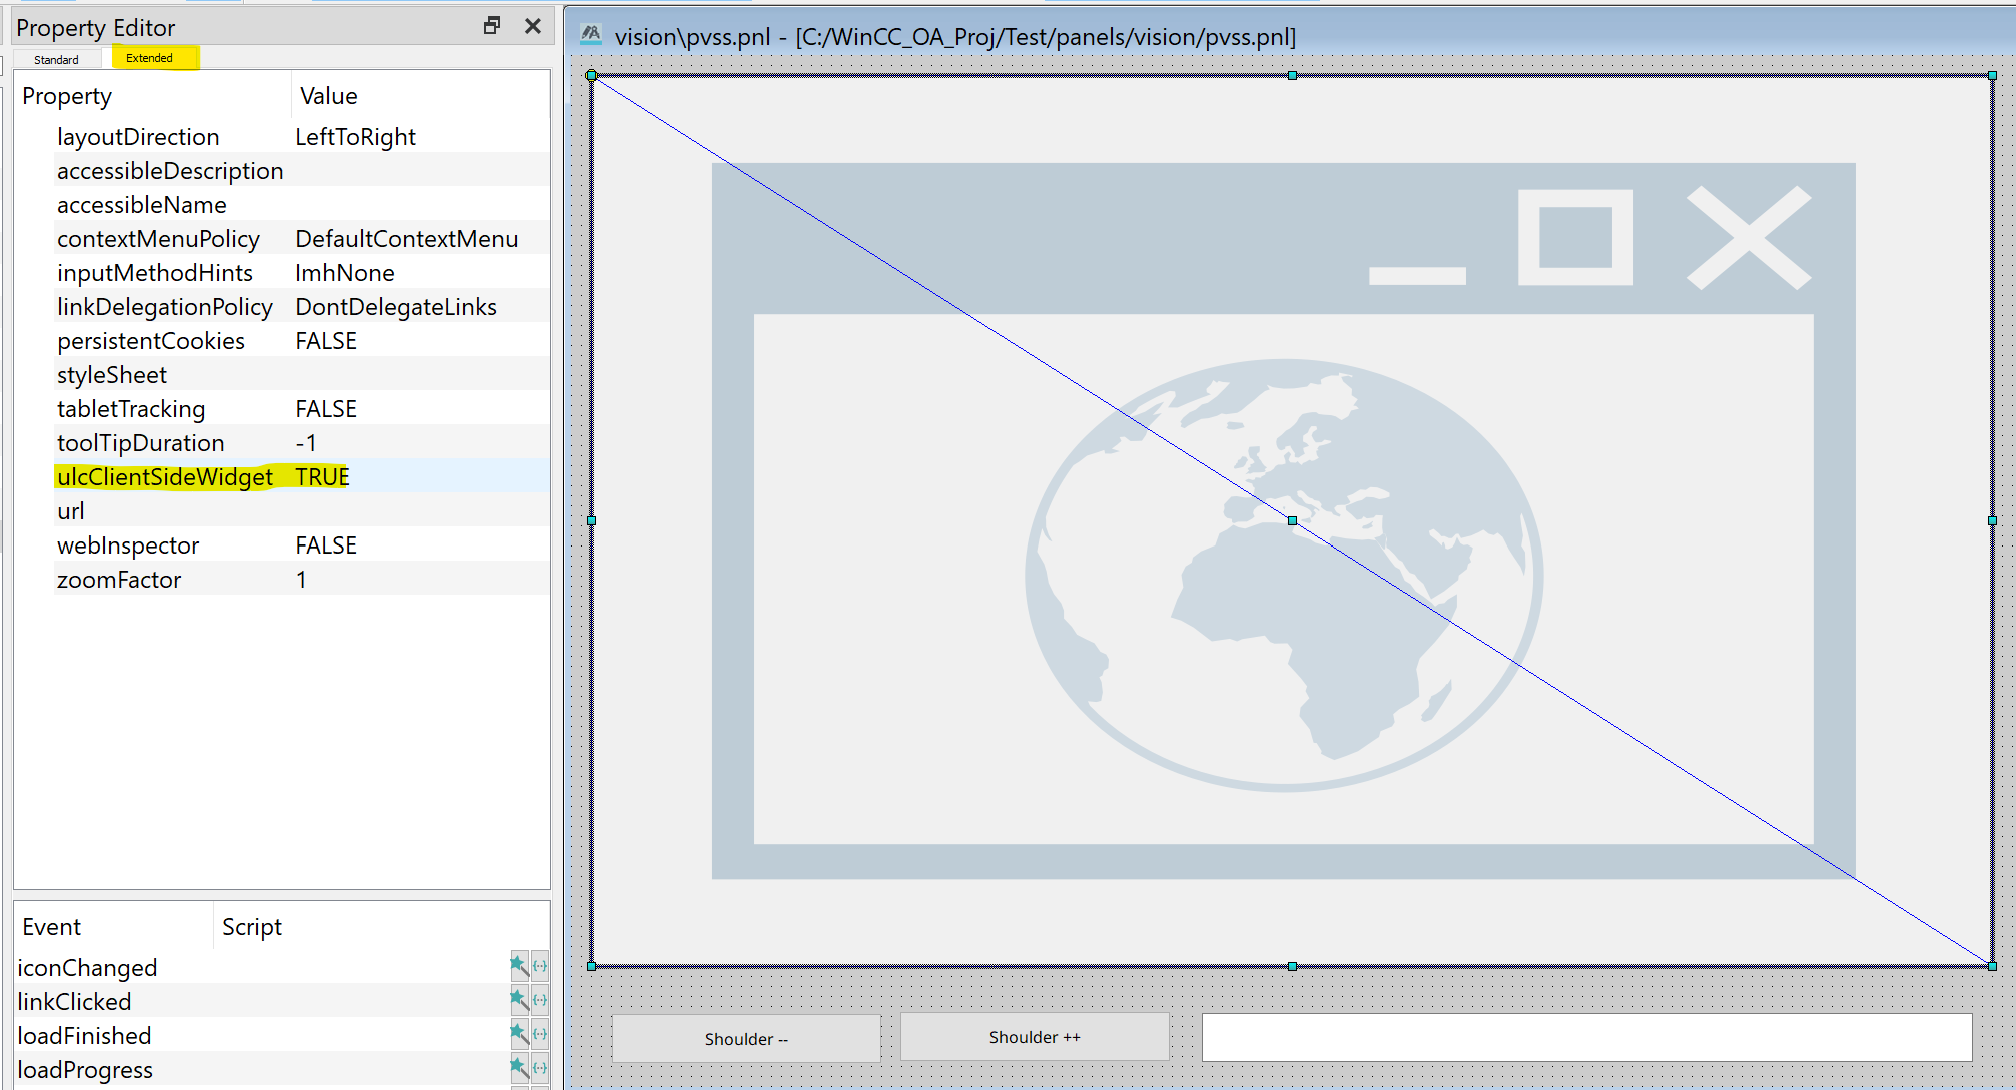
Then you must insert a WebView into your screen.
And then you must load the generated Unity application in the Initialize script of the widget.
In the Property Editor at the Extended tab be sure to set the “ulcClientSideWidget” to TRUE.
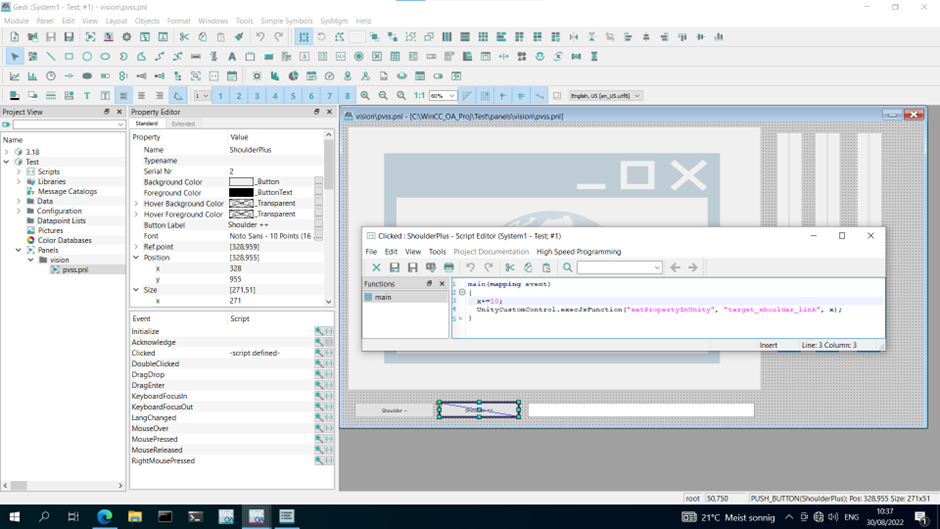
Set and receive property values
To send values from your WinCC Open Architecture to the Unity application you must use execJsFunction of the Webview and call the “setPropertyInUnity” function with the property and the value which you want to set. See the following example.
“UnityCustomControl” is the name of our Webview Widget! It’s up to you how you name it.
At the WebView there is an event “messageReceived”. There you will get all the messages which are sent from Unity to WinCC Open Architecture. See the example for the structure of the parameter. It is always a JSON document which contains the Name and the Value of the property which has been sent.
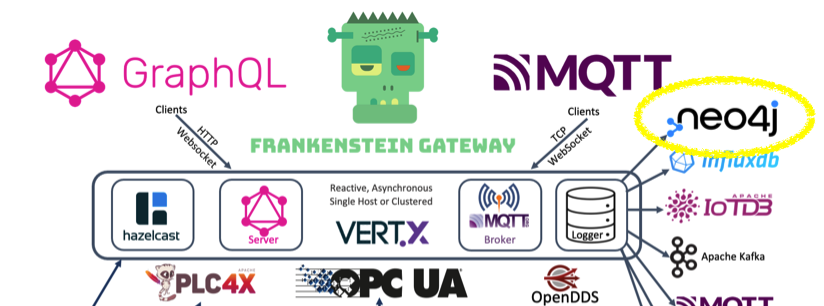
At startup it can also write the OPC UA node structure into the graph database, so that the basic model of the OPC UA server is mirrored to the graph database. For that you have to add the “Schemas” section in the config file (see an example configuration file below). There you can choose which RootNodes (and all sub nodes) of your OPC UA systems should be mirrored to the graph database.
Once you have the (simplified) OPC UA information model in the graph database, you can add on top of that your own knowledge graph data and create relations to OPC UA nodes of your machines to enrich the semantic data of the OPC UA model.
With that model you can leverage the power of your Knowledge Graphs in combination with live data from your machines and use Cypher queries to get the knowledge out of the graph.
Here we see an example of the OPC UA server from the SCADA System WinCC Open Architecture. The first level of nodes below the “Objects” node represent Datapoint-Types (e.g. PUMP1) followed by the Datapoint-Instances (e.g.: PumpNr) and below that we see the datapoint elements (e.g. value => speed). An datapoint element is an OPC UA variable where we also see the current value from the SCADA system.
Example Gateway configuration file:

Database:
  Logger:
    - Id: neo4j
      Enabled: true
      Type: Neo4j
      Url: bolt://nuc1.rocworks.local:7687
      Username: "neo4j"
      Password: "manager"
      Schemas:
        - System: opc1  # Replicate node structure to the graph database
          RootNodes:
            - "ns=2;s=Demo"  # This node and everything below this node
        - System: winccoa1  # Replicate the nodes starting from "i=85" (Objects) node
      WriteParameters:
        BlockSize: 1000
      Logging:
        - Topic: opc/opc1/path/Objects/Demo/SimulationMass/SimulationMass_Float/+
        - Topic: opc/opc1/path/Objects/Demo/SimulationMass/SimulationMass_Double/+
        - Topic: opc/opc1/path/Objects/Demo/SimulationMass/SimulationMass_Int16/+
        - Topic: opc/winccoa1/path/Objects/PUMP1/#
        - Topic: opc/winccoa1/path/Objects/ExampleDP_Int/#
If your docker container do not use all your cpu’s, it may be the case that limits are set in /etc/systemd/system/docker.slice. To apply changed settings I had to reboot my machine (just a restart of docker didn’t change the behaviour).