At our USA Tour, someone asked about voice interaction with WinCC OA – and luckily, I had exactly that showcase in my demo.
I recorded a quick demo (not perfectly, sorry), but it still shows how easy it is to bring LLMs into WinCC OA: capturing voice directly in the browser, sending it to an LLM via simple HTTP REST calls, and letting the system respond or act.
WinCC OA is open and flexible – that’s why use cases like this can be built so quickly.
And excuse the not-so-nice UI – I built it myself 😄
🧐 Lot of people think that WinCC software is not easy to access and try out – but that‘s not true: WinCC Open Architecture can be downloaded for free!
👉 All you need to do is register with your email, and you’ll get access to the software at no cost. You can explore and learn it without limitations. It runs for about 30 minutes before restarting – not ideal for production use, but absolutely perfect for learning, experimenting, or building a proof of concept for potential customers.
💪 For those unfamiliar with WinCC Open Architecture: it’s not only a full-fledged SCADA system – it’s also an IT/OT platform. True to its name, ‘Open Architecture,’ you can literally connect anything to it and extract everything from it in an open and flexible manner.
🖐️ It runs on devices as small as a Raspberry Pi, yet it can scale up to a distributed system, forming a unified cluster and providing a comprehensive view of all your business operations – whether it’s at the New York Underground or the largest machine humans have ever built: CERN.
Starting with WinCC OA Version 3.20, you can write your business logic in JavaScript and run them using Node.js, providing direct access to the WinCC OA Runtime.
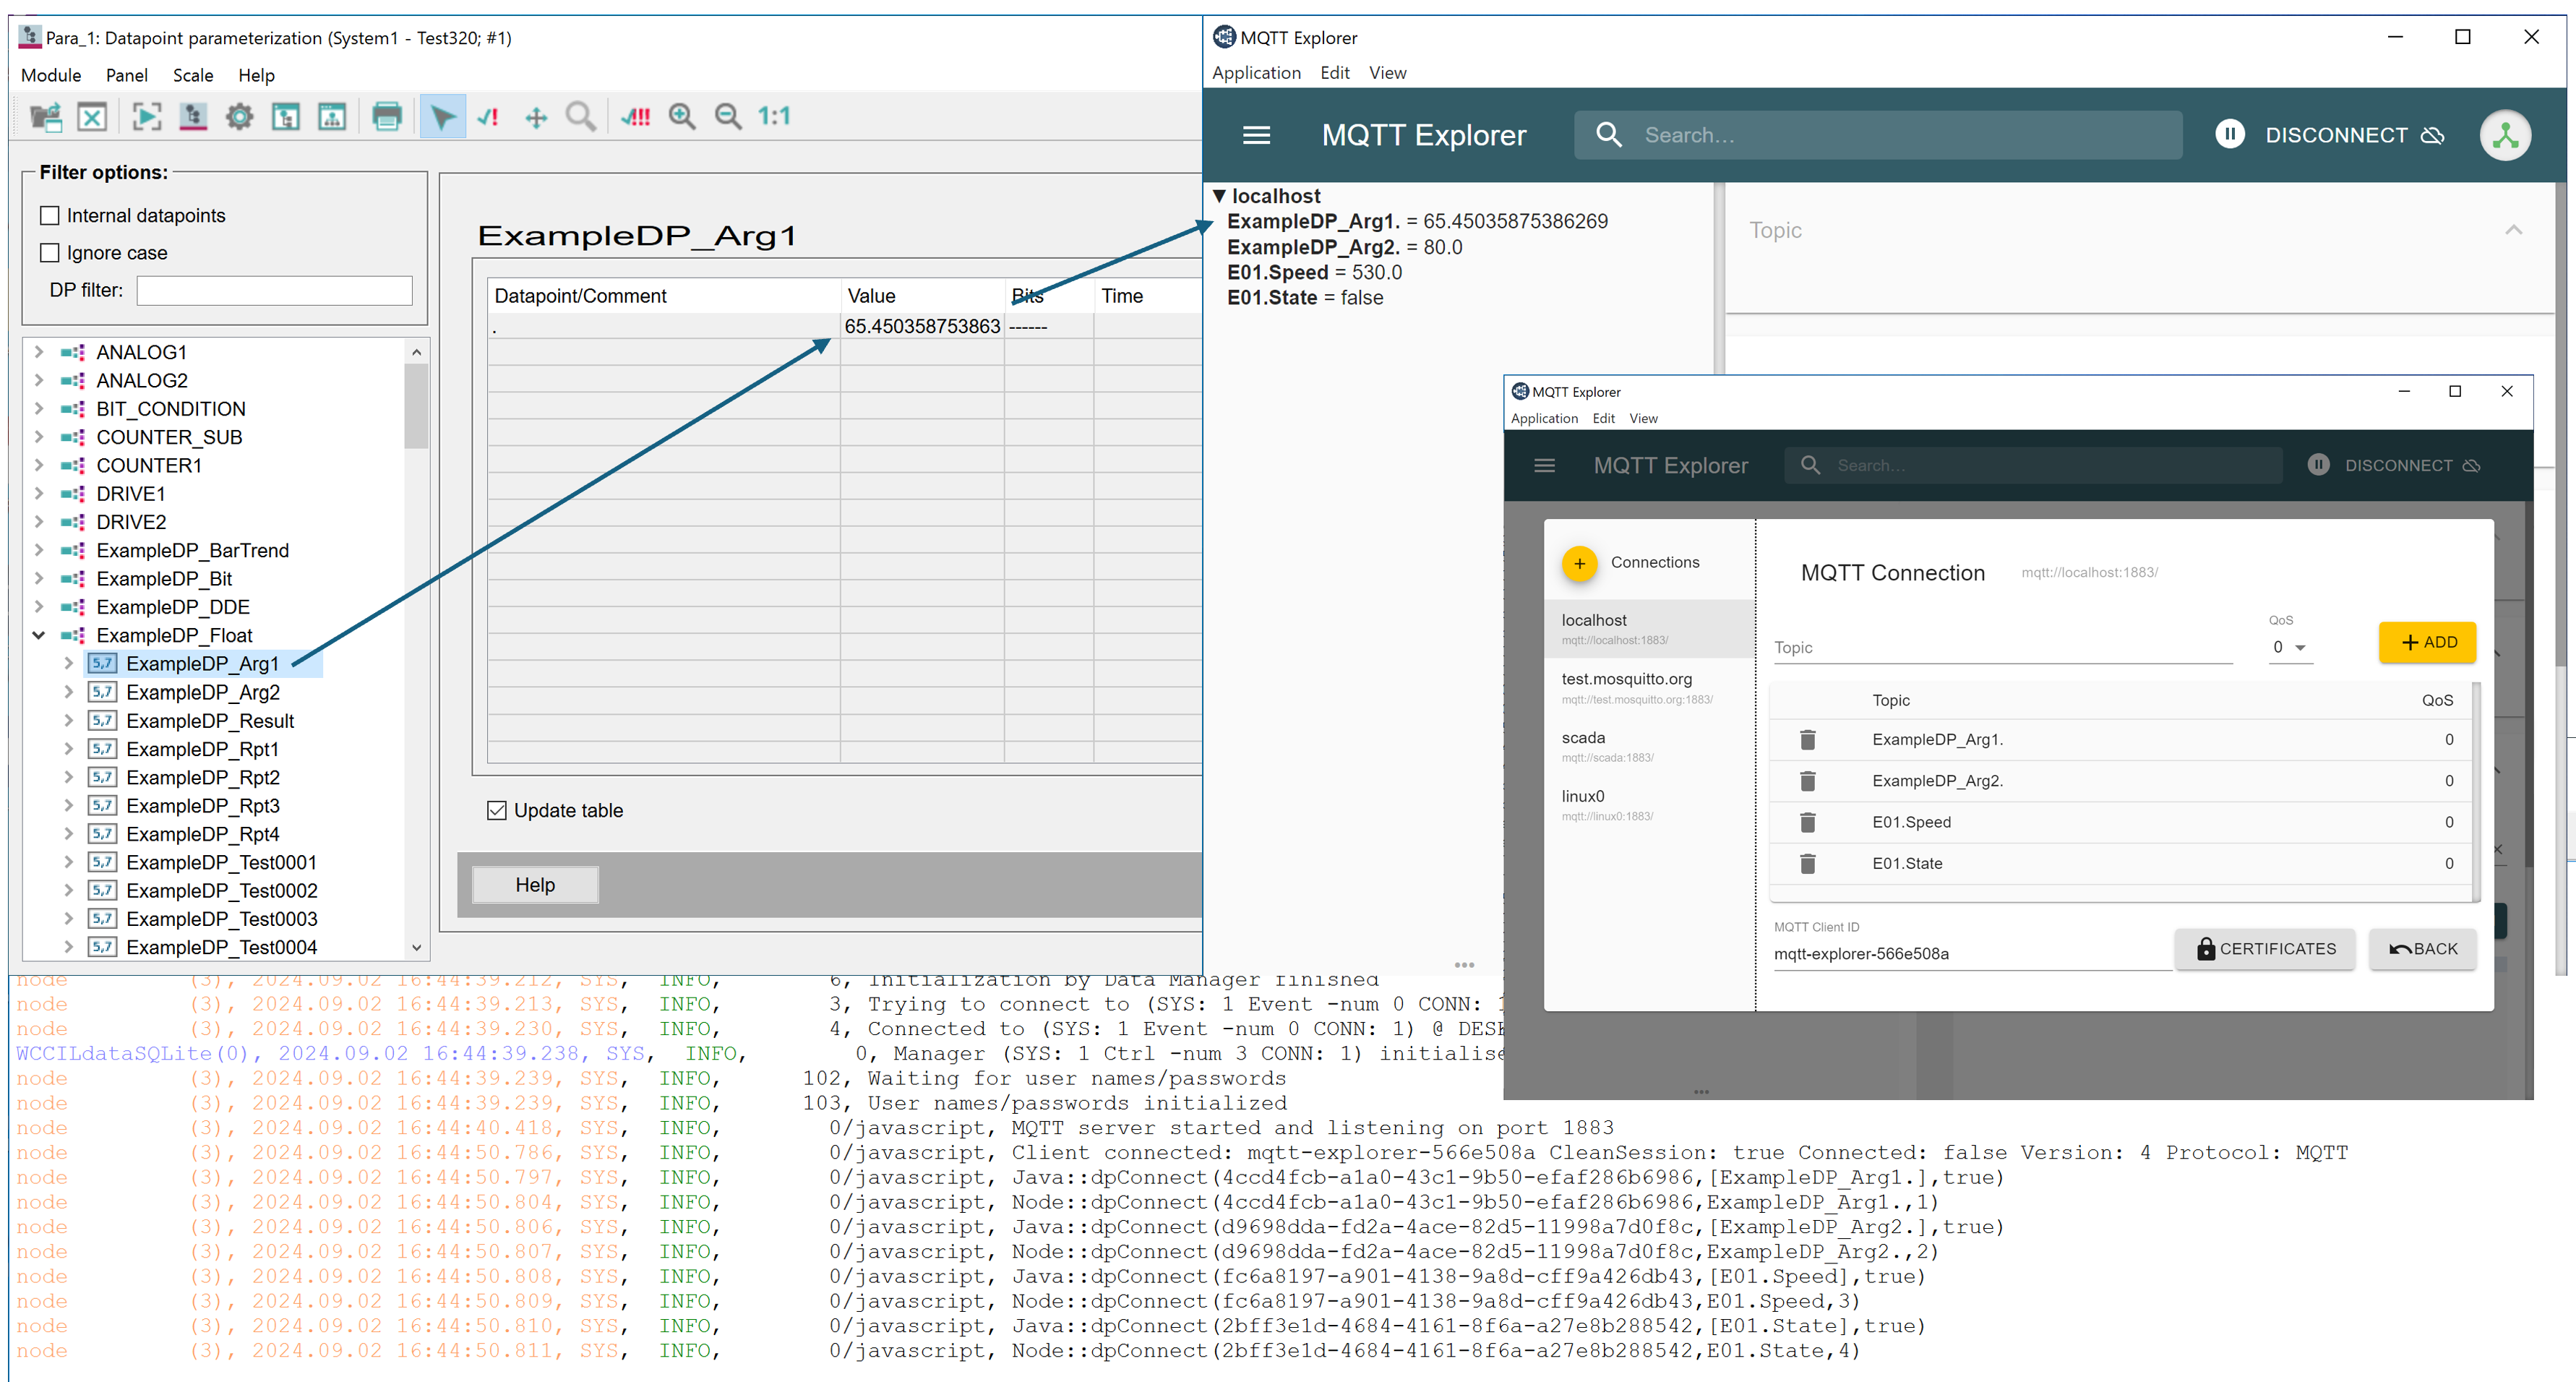
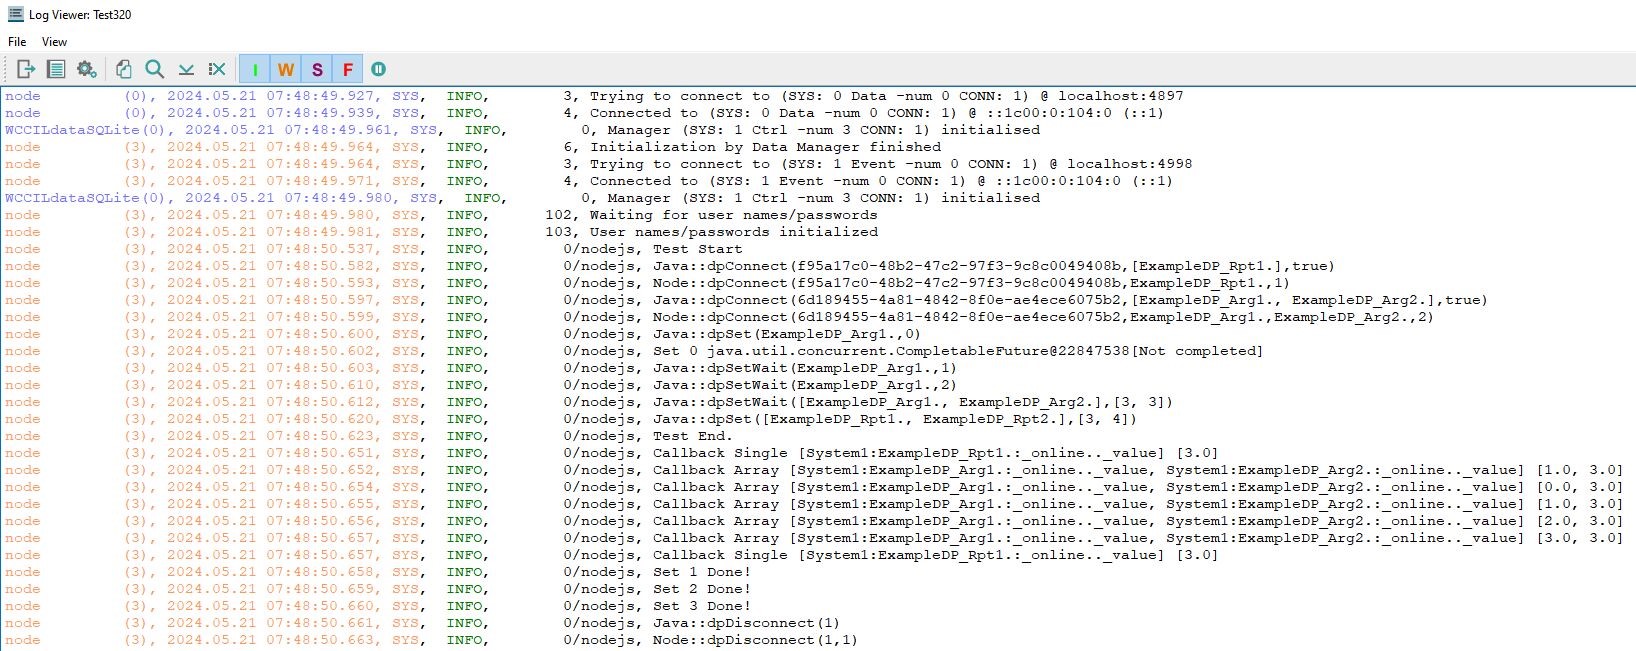
🙈 With that, I have developed a Kotlin program that acts as an MQTT Broker. When you subscribe to a topic (where the topic name matches a datapoint name), the program will send value changes from the corresponding WinCC OA datapoint to your MQTT client.
❓ But wait, Kotlin is like Java, it runs on the JVM, it is not JavaScript!
💡 Did you know that a Node.js Runtime built with GraalVM exists? It allows you to mix Java and JavaScript. And it also works with WinCC OA.
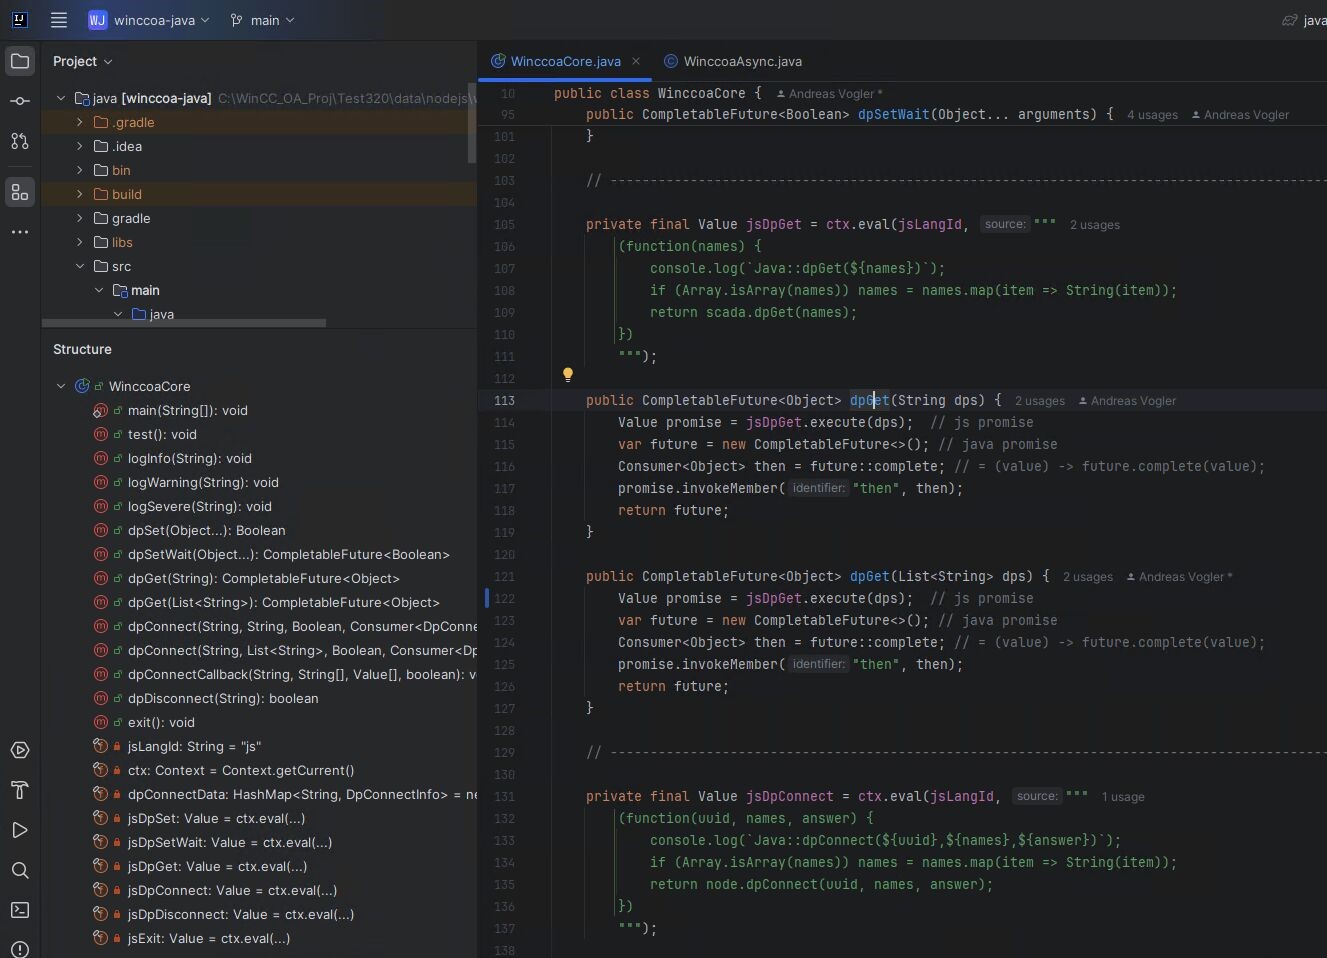
🤩 You can use JVM based languages and its huge ecosystem to develop business logic with WinCC OA. I have developed a Java library which makes it easier to use the WinCC OA JavaScript functions in Java.
👉 Here it is: https://github.com/vogler75/winccoa-graalvm please note that the example program is provided as an example; it lacks security features and has not been tested for production use. However, it can be extended and customized to meet specific requirements.
⚡ Please be aware that the GraalVM Node.js Runtime is not officially supported by WinCC Open Architecture.
🥳 Last weekend I found some time to try out an upcoming feature in WinCC Open Architecture 3.20. With the Node.js integration you can write your business logic in JavaScript with native connectivity to WinCC OA. You can take full advantage of the Node.js ecosystem.
🧐 But I am a Java enthusiast and I love the JVM ecosystem. Have you ever heard about GraalVM? It is an advanced JDK written in Java. And it has a Node.js Runtime, which gives you the power of Node.js plus the power of polyglot programming, you can mix JavaScript with Java.
👍 And it turned out that the GraalVM Node.js Runtime also works with WinCC OA! It took me some time to figure out how the polyglot interoperability works, but now I have a first draft of a Java-Library which makes it easy to use Java and OA in the Node.js environment.
🤩 I can now use Java to develop great solutions with WinCC OA.
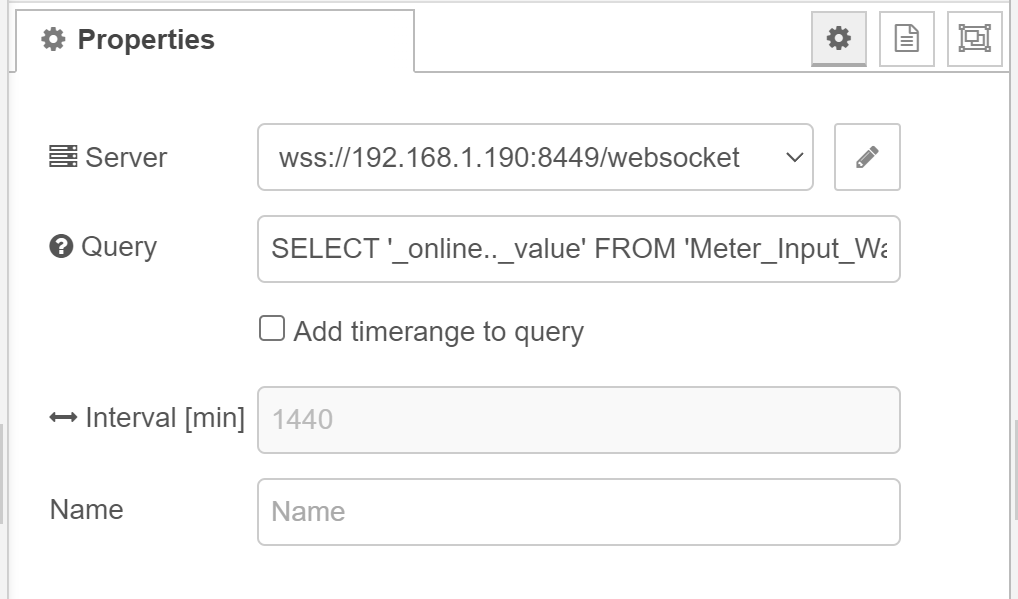
You can now add a Node. In that example we will use the dpQuery node and use “SELECT ‘_online.._value’ FROM ‘Meter_Input_WattAct.'” as query. So we just query the online value of one tag.
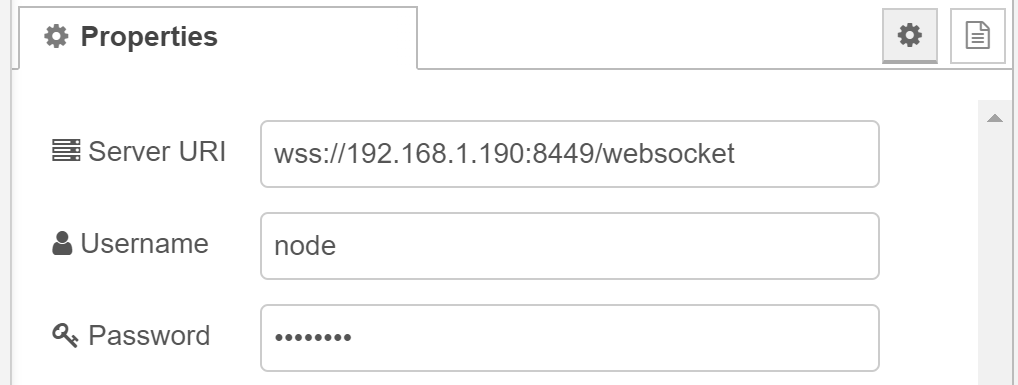
You have to configure the Server by clicking on the pencil button. This points to the before started Websocket Control Manager and you have to set the username and password we have added in one of the previous steps.
The integration of SCADA with Spark and WinCC Open Architecture offers a powerful and versatile solution that combines real-time data processing, advanced analytics, scalability, and flexibility. This combination empowers you to optimize industrial processes, make data-driven decisions, and stay ahead in a rapidly evolving technological landscape.
By utilizing my 5-year-old project that implemented a native Java manager for WinCC Open Architecture, I have enabled the integration of SCADA with Spark for the current WinCC OA Version 3.19.
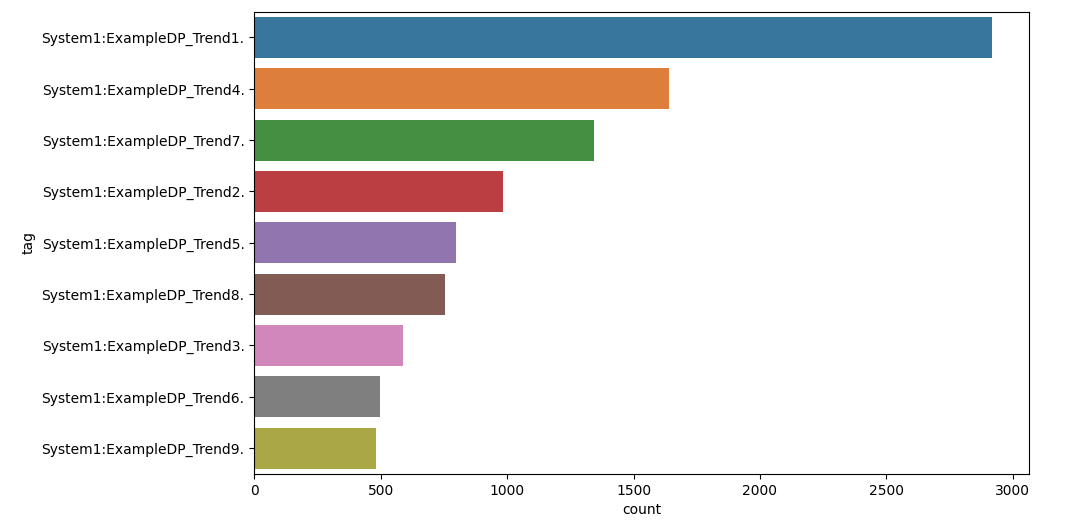
Very simple example is to analyze tags and the corresponding amount of values in your SCADA system can provide valuable insights into the distribution and characteristics of the data.
res = spark.sql('SELECT tag, count(*) count FROM events GROUP BY tag ORDER by count(*) DESC')
data = res.toPandas()
plt.figure( figsize = ( 10, 6 ) )
sns.barplot( x="count", y="tag", data=data)
plt.show()
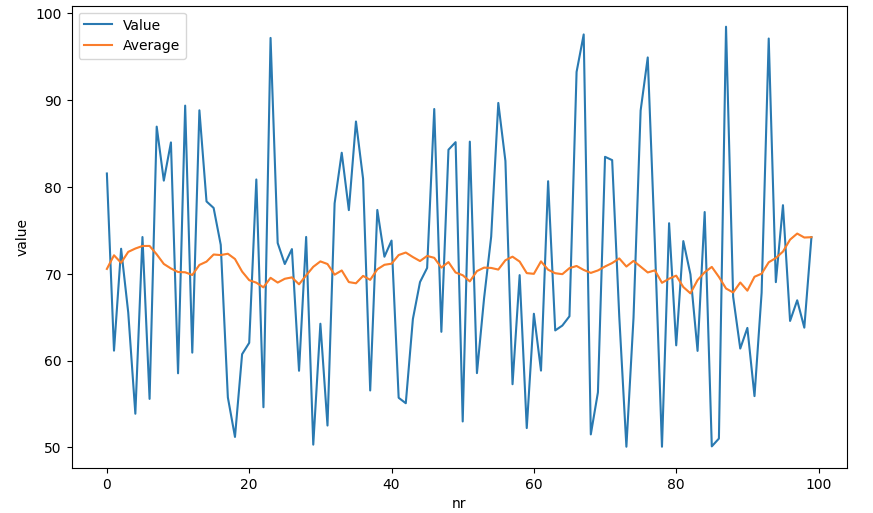
Another simple example is to calculate the moving average of 10 preceding and following values for a given data point in a time series, you can use a sliding window approach:
data = spark.sql("""
SELECT ROUND(value,2) as value,
  AVG(value) OVER (PARTITION BY tag ORDER BY ts
  ROWS BETWEEN 10 PRECEDING AND 10 FOLLOWING) avg
  FROM events
  WHERE tag = 'System1:ExampleDP_Trend2.'
  ORDER BY ts DESC
  LIMIT 100
  """).toPandas()
data = data.reset_index().rename(columns={"index": "nr"})
sns.lineplot(data=data, x='nr', y='value', label='Value')
sns.lineplot(data=data, x='nr', y='avg', label='Average')
plt.show()
By leveraging the distributed file system, you can take advantage of Spark’s parallel processing capabilities. The distributed file system ensures that the data frame is partitioned and distributed across the nodes of the Spark cluster, enabling simultaneous processing of data in parallel. This distributed approach enhances performance and scalability, allowing for efficient handling of large volumes of real-time SCADA data.
I have achieved real-time data streaming from WinCC OA to a Spark cluster with a Websocket-Server based on the Java manager. This streaming process involves continuouslytransferring SCADA real-time data from the WinCC OA system to the Spark cluster for further processing and analysis.
Once the data is received by the Spark cluster, I store it as a data frame on the distributed file system (DFS). A data frame is a distributed collection of data organized into named columns, similar to a table in a relational database. Storing the data frame on the distributed file system ensures data persistence and allows for efficient processing and retrieval.
bulk = []
last = datetime.datetime.now()
def on_message(message):
    global bulk, last, start
    data = json.loads(message)

    if "DpQueryConnectResult" in data:
        values = data["DpQueryConnectResult"]["Values"]
        for tag, value in values:
            #print(tag, value)
            data = {"ts": datetime.datetime.now(), "tag": tag, "value": value}
            bulk.append(data)

    now =datetime.datetime.now()
    time = datetime.datetime.now() - last
    if time.total_seconds() > 10 or len(bulk) >= 1000:
        last = now

        # Create a new DataFrame with the received data
        new_df = spark.createDataFrame(bulk, schema)

        new_df.write \
            .format("csv") \
            .option("header", "true") \
            .mode("append") \
            .save("events.csv")

        bulk = []
Once the SCADA data is stored as a distributed data frame on the Spark cluster’s distributed file system, you can leverage Spark’s parallel processing capabilities to efficiently process the data in parallel.
By combining SCADA (Supervisory Control and Data Acquisition) with Spark’s powerful data processing capabilities, I have created a solution that can handle large volumes of real-time data efficiently. This enables faster and more accurate decision-making based on the insights derived from the processed data.
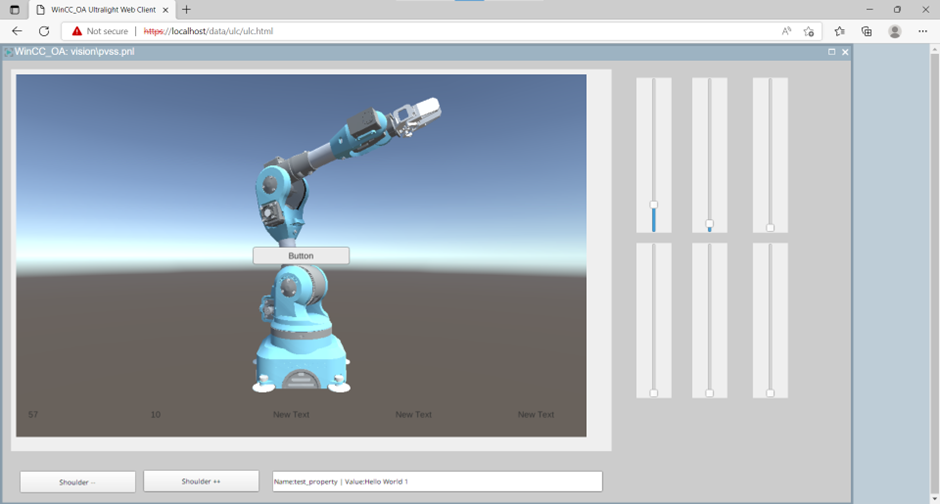
This article is about integrating your 3D Unity applications into WinCC Open Architecture SCADA HMI Web screens and exchanging property values. It only works with the WinCC Ultralight Web Client. Because the native Ui does not support WebGL in the WebView Widget. Update: It should also work in the native Ui, you just have to set the environment variable: QTWEBENGINE_CHROMIUM_FLAGS=–enable-gpu
With this free Unity Asset you can create a Unity application with an interface to the SCADA system in an easy way. Don’t be confused about the name of the Asset “WinCC Unified Custom Web Control”. This is because initially it was build to create Custom Web Controls for WinCC Unified only. But there is now also an option to create a build of your Unity application for WinCC Open Architecture.
First create and build your Unity Application as described in the documentation of the Asset. You may also watch this video.
Just at the end execute the menu item to create a WinCC Open Architecture application, instead of WinCC Unified.
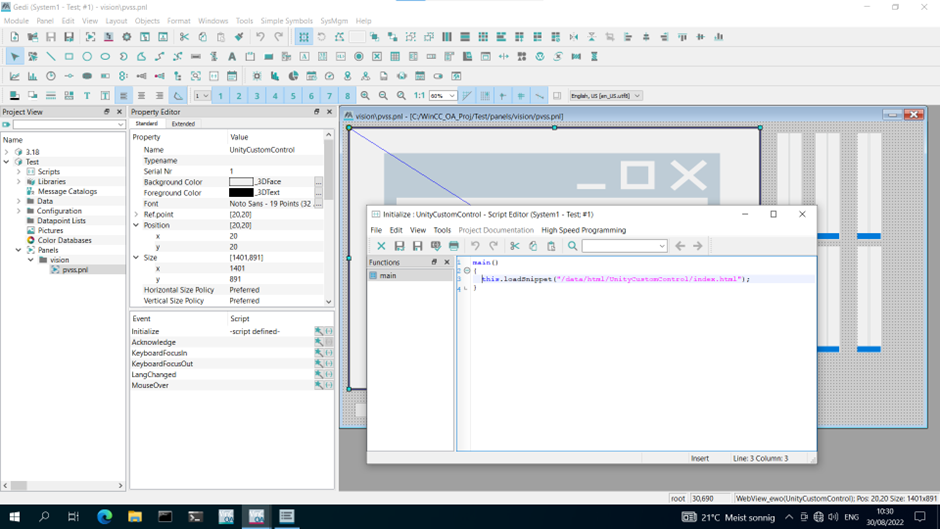
Create and load the WebView
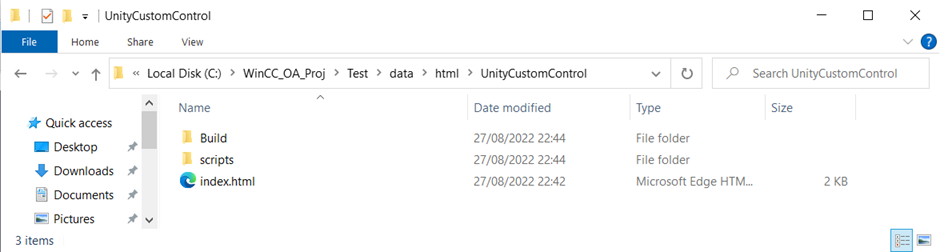
Then copy the ZIP file to your WinCC OA project into the folder “data\html” and unzip the ZIP (for example C:\WinCC_OA_Proj\Test\data\html\UnityCustomControl).
In this tutorial our application is named “UnityCustomControl”. You have to replace this with the name of your Unity application.
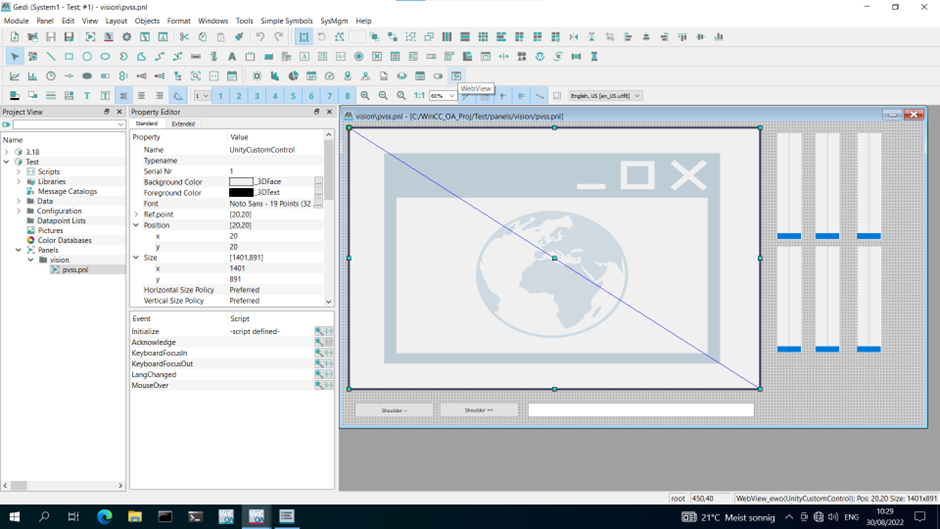
Then you must insert a WebView into your screen.
And then you must load the generated Unity application in the Initialize script of the widget.
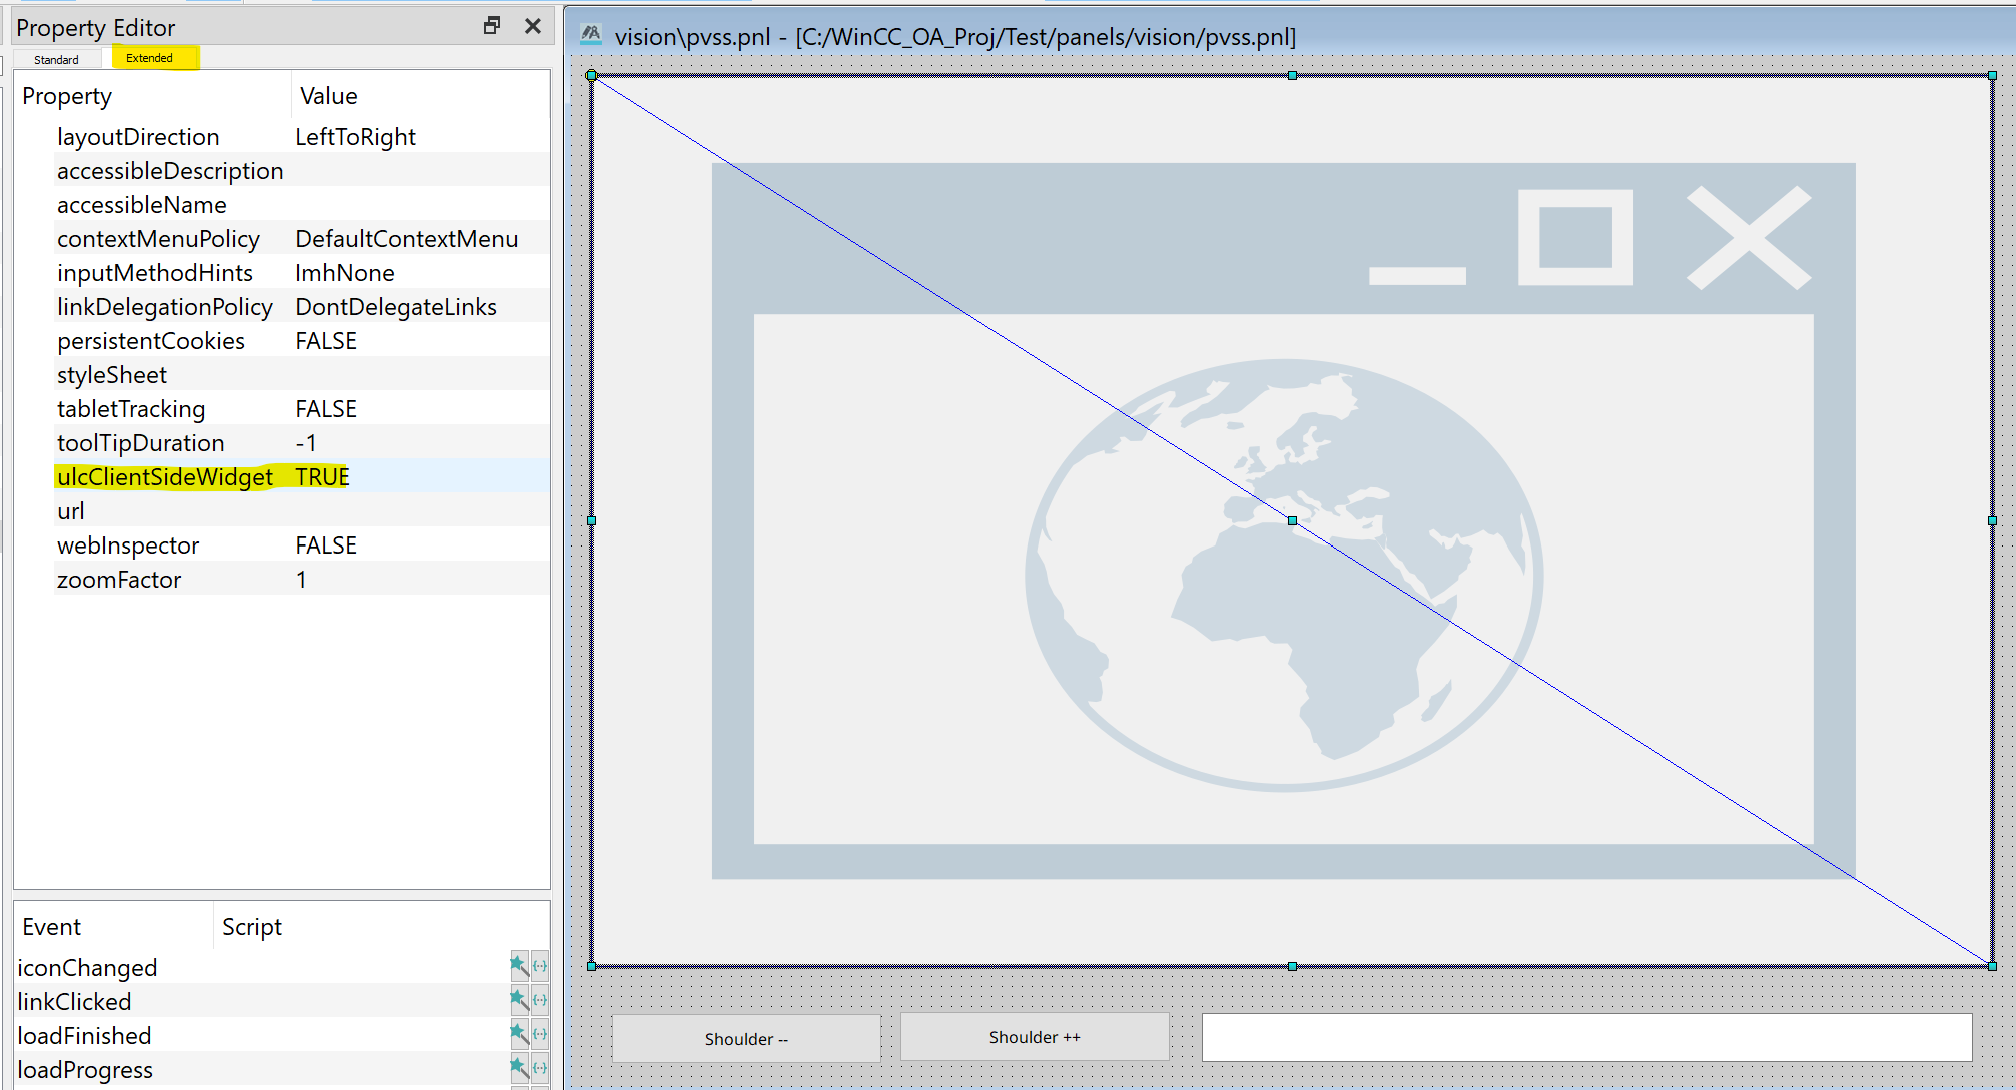
In the Property Editor at the Extended tab be sure to set the “ulcClientSideWidget” to TRUE.
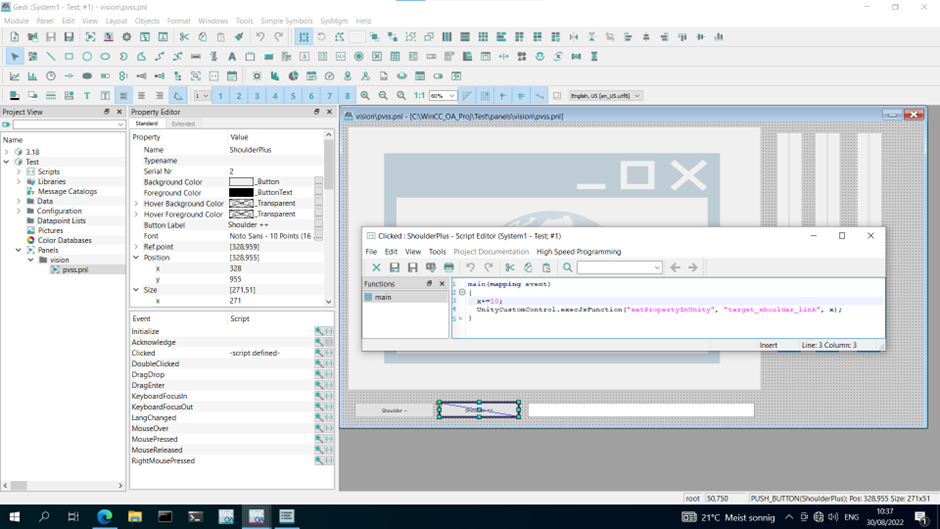
Set and receive property values
To send values from your WinCC Open Architecture to the Unity application you must use execJsFunction of the Webview and call the “setPropertyInUnity” function with the property and the value which you want to set. See the following example.
“UnityCustomControl” is the name of our Webview Widget! It’s up to you how you name it.
At the WebView there is an event “messageReceived”. There you will get all the messages which are sent from Unity to WinCC Open Architecture. See the example for the structure of the parameter. It is always a JSON document which contains the Name and the Value of the property which has been sent.
Add a label object into your screen and add some lines of code to get a QR image. In this example a mobile phone app will scan the QR code and send username and password via a GraphQL server to WinCC OA and set it on datapoints (username and password should additionally be encrypted).