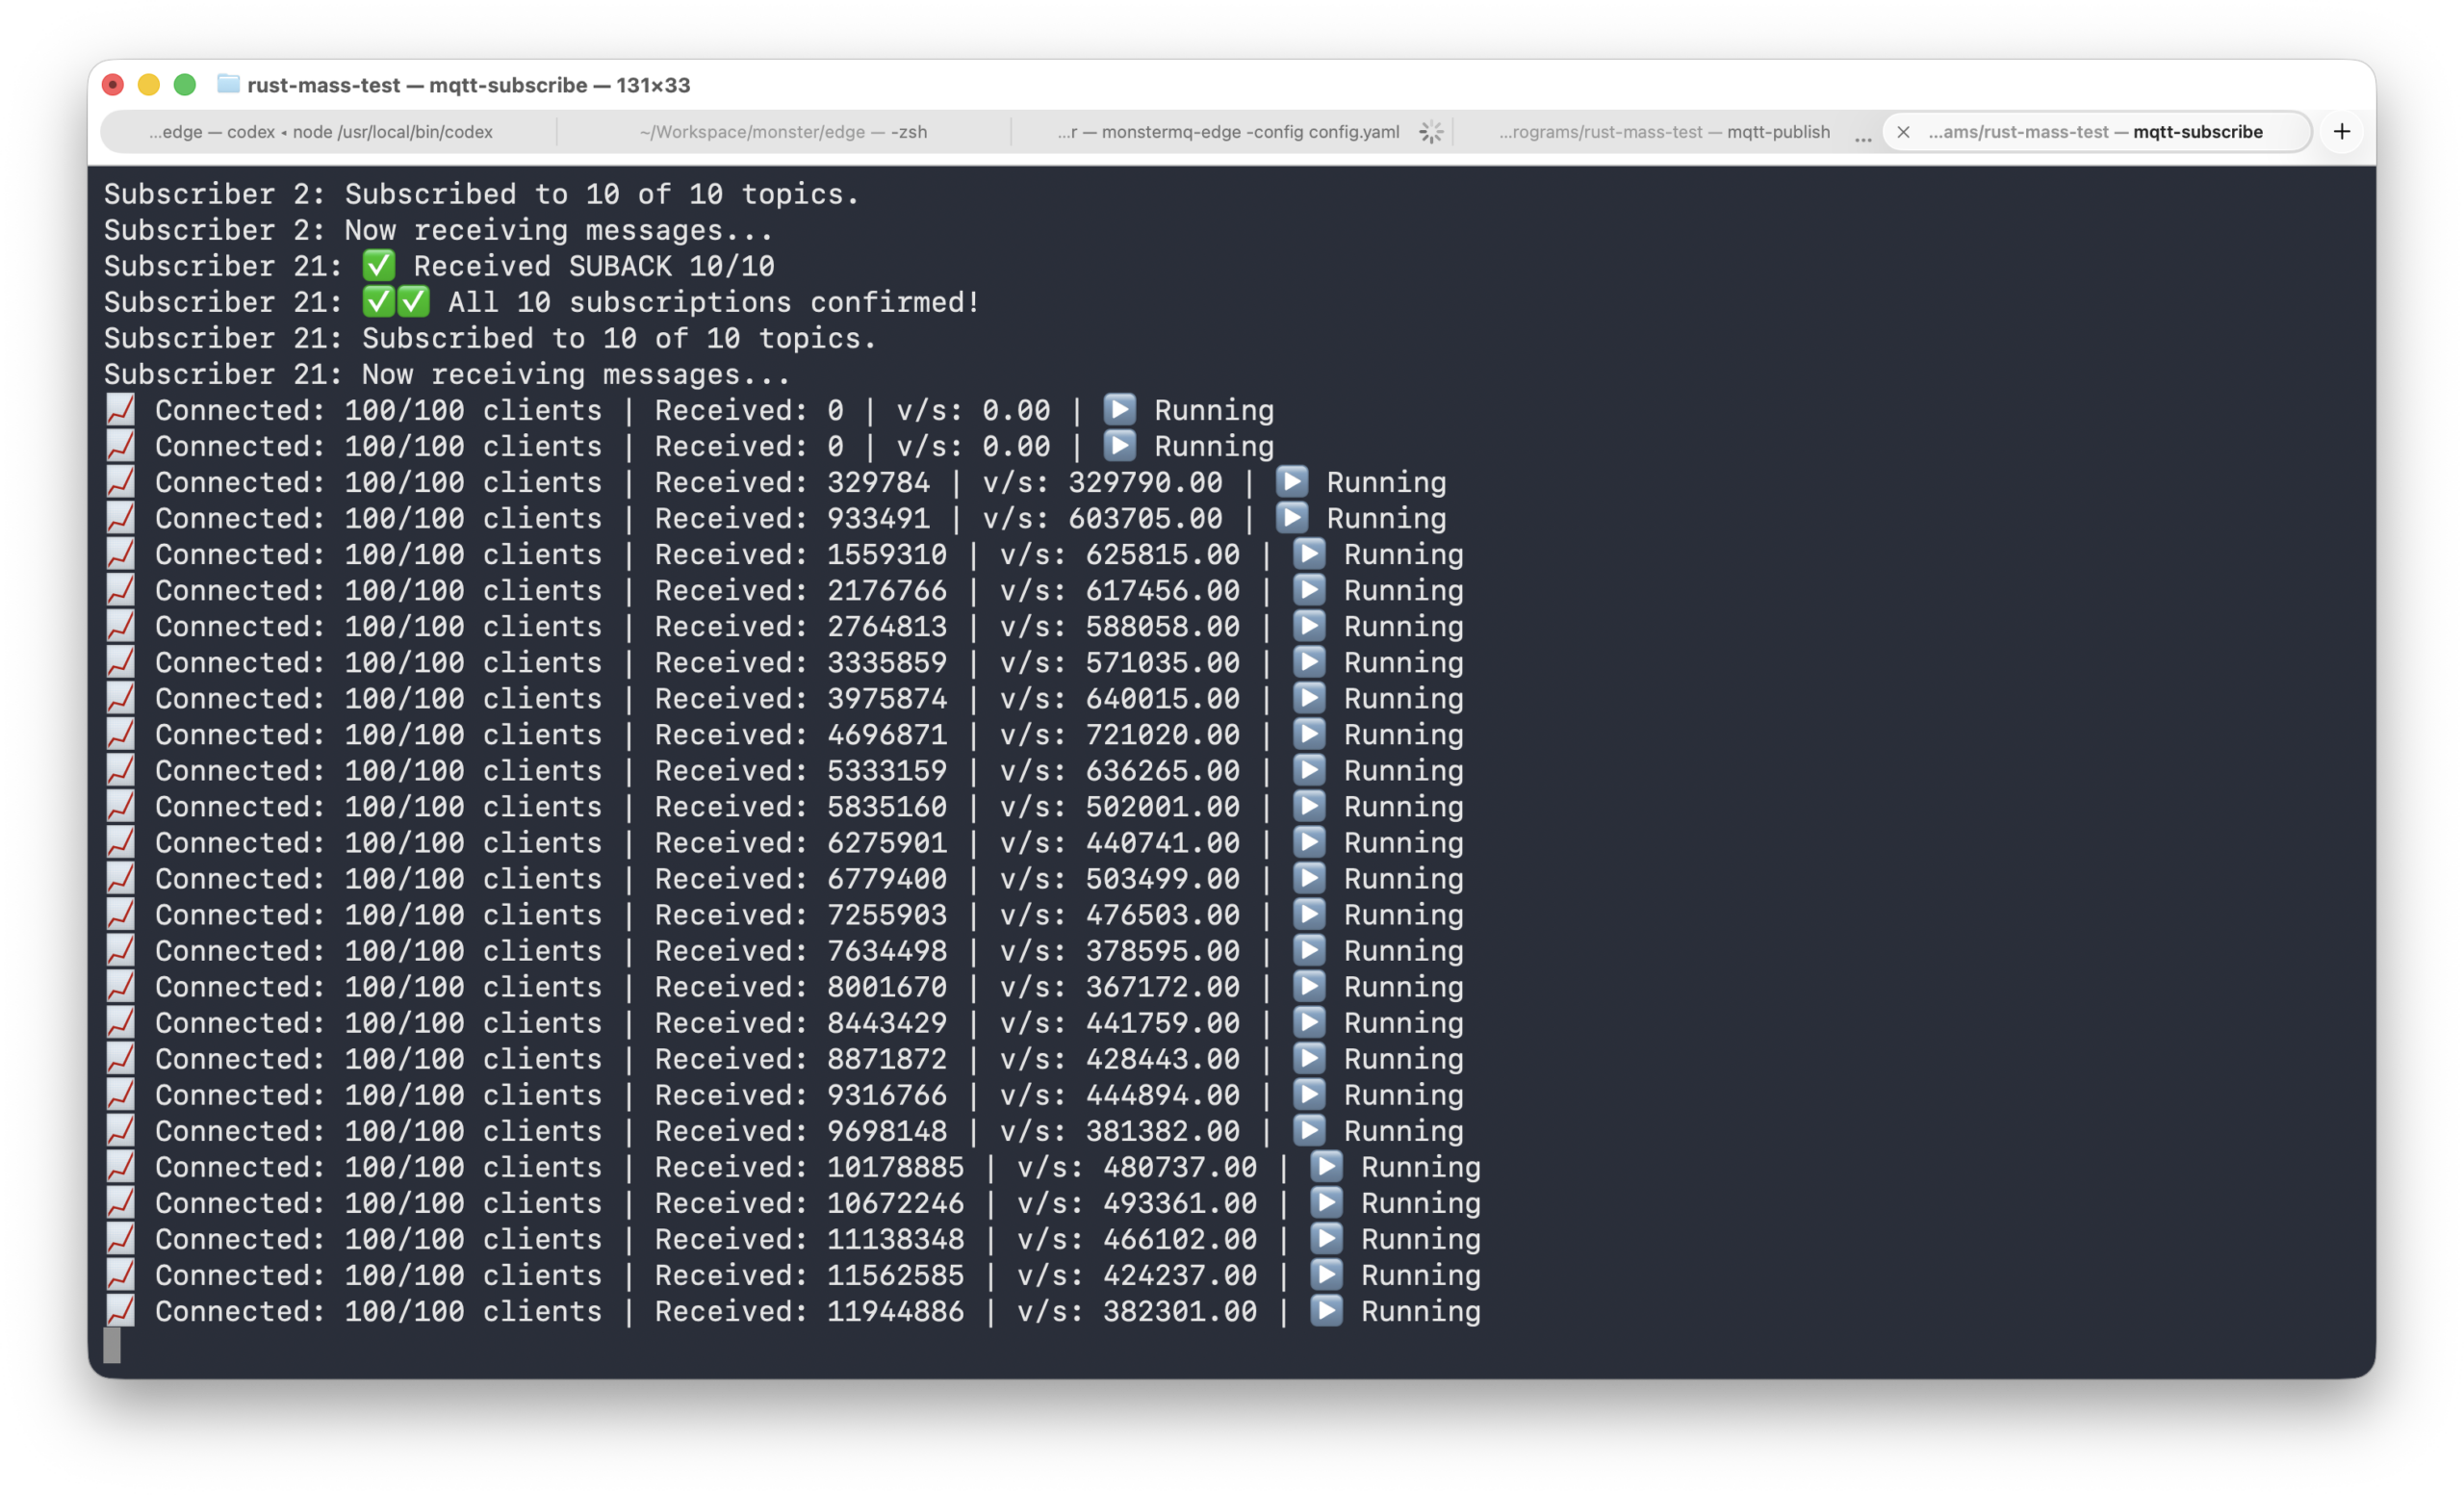
We recently ran a benchmark test pushing **MonsterMQ-Edge** to its limits on a single fanless MacBook Air.
During the test, the CPU throttled due to the lack of active cooling, which restricted the hardware’s performance. Despite this thermal throttling, MonsterMQ-Edge—running alongside two lightweight Rust test programs—successfully sent and received approximately **500 kHz** (500,000 messages per second).
This demonstration showcases the resilience, low overhead, and high performance of MonsterMQ-Edge even under thermally constrained hardware conditions.
Welcome to a brand new episode of our tech podcast! Today, we are diving deep into the world of industrial IoT, OT-to-IT bridging, and how a revolutionary open-source project is changing the game. We are thrilled to present our episode: “MonsterMQ Collapses the Industrial Protocol Soup.”
Listen to the episode: MonsterMQ Collapses the Industrial Protocol Soup
What is MonsterMQ?
At its core, MonsterMQ is a next-generation, high-performance MQTT broker specifically designed for Industrial IoT (IIoT) and real-time enterprise messaging. Built on top of the ultra-fast Vert.x reactive runtime, MonsterMQ isn’t just another broker—it is a complete, multi-protocol edge integration engine. It blends high-speed message queuing, native database logging, visual flow-based processing, and autonomous AI agents into a single, unified runtime.
The “Industrial Protocol Soup” Challenge
If you’ve ever worked in a modern factory or industrial environment, you know the pain. Operational Technology (OT) is a fragmented ecosystem of legacy and proprietary protocols. You have PLCs talking Siemens S7 or Modbus, SCADA systems like WinCC OA or WinCC Unified exposing internal tag engines, and other machines using OPC UA.
To get this data into IT systems, companies traditionally build complex pipelines involving multiple gateway boxes, custom translators, external MQTT brokers, database connectors, and cloud bridges. This fragmented architecture is difficult to maintain, introduces significant latency, and creates a fragile “protocol soup” that is prone to breaking.
How MonsterMQ Collapses the Soup
MonsterMQ simplifies this mess by acting as a single, consolidated platform that speaks both OT and IT languages natively. Instead of daisy-chaining middleware, MonsterMQ integrates these components directly into the broker:
Native OT Adapters: Connects directly to OPC UA, PLC4X (S7/Modbus), WinCC OA, WinCC Unified, and even Redis or Kafka.
Dual-Engine Core (MQTT & NATS): Supports MQTT 3.1.1/5 and native NATS protocol handling. It can route messages between MQTT and NATS clients with zero external bridges, allowing OT devices to seamlessly talk to high-speed backend microservices.
Direct-to-Database Archiving: Logs data directly to PostgreSQL, CrateDB, MongoDB, SQLite, and Snowflake via schema-based JDBC logging. No separate database loggers required.
What Makes MonsterMQ Truly Unique?
Beyond traditional bridging, MonsterMQ introduces two groundbreaking features that set it apart from standard brokers:
1. Built-in JavaScript Flow Engine
MonsterMQ features a visual, JavaScript-based workflow and flow engine. This allows engineers to filter, transform, aggregate, and route messages on the fly using standard JavaScript directly inside the broker context. You can write custom script blocks to sanitize data before archiving or trigger webhooks when variables cross critical thresholds.
2. Autonomous Edge AI Agents
In a world-first for MQTT brokers, MonsterMQ integrates native AI agent orchestration. Supporting multiple LLM providers (including Gemini, Claude, OpenAI, and Ollama), you can configure AI agents that trigger on specific MQTT topics, run on cron schedules, or talk to other agents. This opens the door to edge-based anomaly detection, natural language querying of industrial tags, and autonomous local troubleshooting.
Key Feature Highlights
Vert.x Architecture: Multi-threaded, non-blocking I/O event loops capable of handling millions of messages with minimal CPU and memory footprints.
Flexible Edge Deployments: A config-based feature flag system allows you to disable heavy extensions (like AI or JDBC storage) on resource-constrained edge gateways while enabling them on cloud instances.
Clustering & High Availability: In-memory clustering (via Hazelcast) allows horizontal scaling across multiple nodes.
Modern APIs: Exposes a comprehensive GraphQL API, REST API (supporting InfluxDB Line Protocol ingestion), and an MCP (Model Context Protocol) server for seamless AI tool integration.
Listen to the full podcast above to hear our hosts break down the architecture, discuss real-world industrial deployments, and share their experiences building on MonsterMQ.
What happens when you turn on a kitchen tap, switch on a light, or drive safely through a complex transit tunnel? Behind the scenes, a highly resilient digital engine manages millions of process variables in real time to keep our modern infrastructure running.
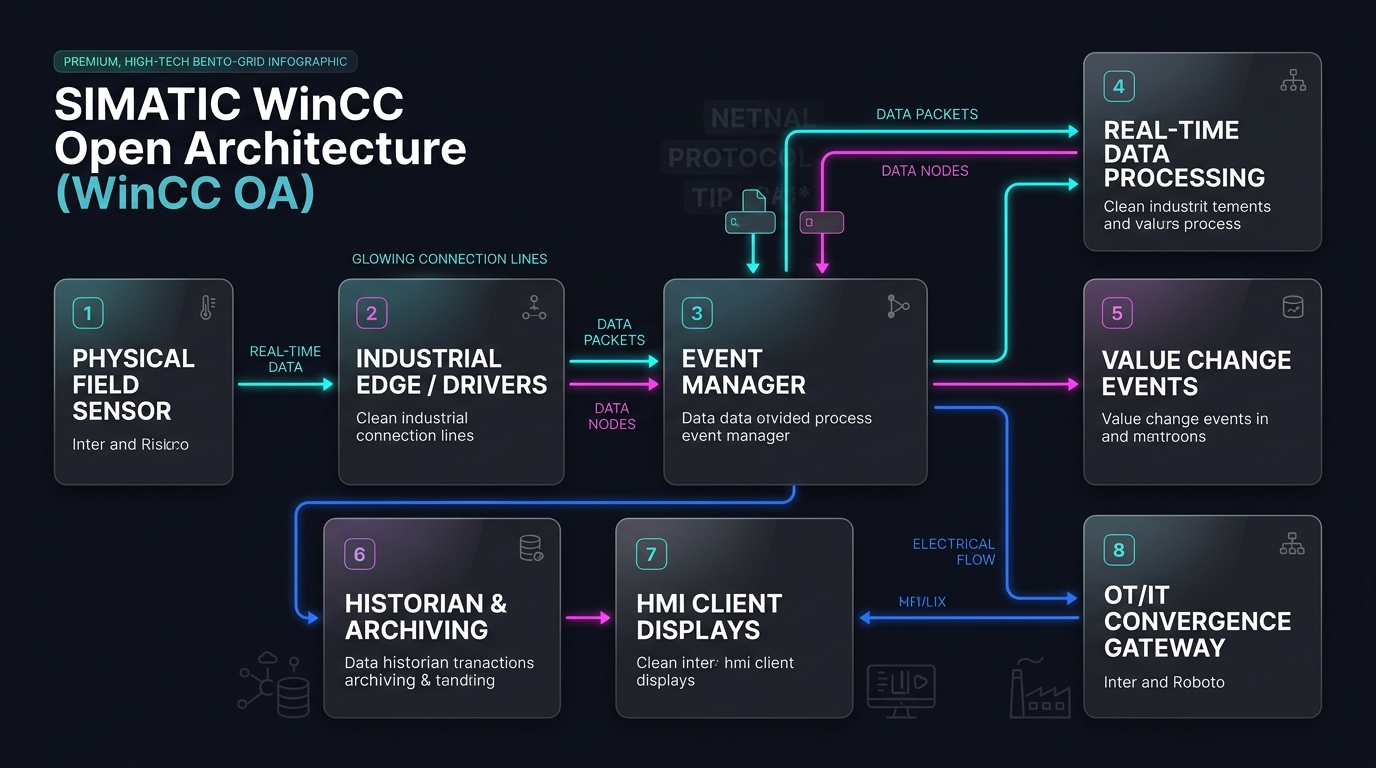
In our latest podcast episode, we dive deep into SIMATIC WinCC Open Architecture (WinCC OA)—a SCADA and HMI powerhouse redefining mission-critical control. Capable of networking up to thousands of servers globally, it’s the ultimate platform for IT/OT convergence.
Inside this episode:
Modular Manager Blueprint: Independent software “managers” separate processing from UI, making the system virtually crash-proof.
Event-Oriented Processing: Active only when value changes, drastically reducing network and CPU load.
Object-Oriented Data Models: Structured templates that update thousands of live machines in real time.
Hurricane-Grade Resilience: Hot-standby redundancy and 2×2 Disaster Recovery Systems.
Safety Standard: The only SCADA software rated SIL 3 since 2008.
Listen to the full episode below to uncover the secrets of the platform trusted with the world’s most sensitive infrastructure.
Running industrial SCADA systems on developer machines can sometimes lead to a cluttered host operating system, dependency conflicts, or difficulties in managing multiple software versions. WinCC Open Architecture (WinCC OA) is a powerful platform, and running it inside a Docker container for development is an elegant solution to these challenges.
In this post, we’ll walk through how to build a WinCC OA container image on your favorite Linux OS (like Ubuntu) and use a convenient access script to keep your projects organized and run GUI tools like the Console and Project Manager seamlessly.
Step 1: Building the WinCC OA Docker Image
Before running the container, we need to build the Docker image. Navigate to the directory where you downloaded and extracted the WinCC OA installation files (which should also contain your Dockerfile), and run the following command:
Why these build arguments? By matching the container’s user ID and group ID with your host user, we avoid file permission issues when editing files and mapping project volumes.
Step 2: Managing the Container with run-container.sh
To automate starting, stopping, and entering the container, we use a custom shell script called run-container.sh. This script works on standard Linux installations as well as macOS using Colima (as a lightweight Docker runtime) and XQuartz (for X11 GUI forwarding).
This script takes care of several important development tasks:
Persistent Container Lifecycle: It checks if the container already exists. If it is stopped, it starts it. If it doesn’t exist, it creates a new one using the winccoa322 image. Since the container runs with sleep infinity, it remains active in the background.
Volume Mapping: Your host user home directory is mounted to the container (-v "$HOME:/home/$USER:rw"). This ensures your projects, configurations, and license files persist on the host system and can be edited with your favorite host IDEs (like VS Code).
Reusable Sessions: You can run the script to enter the running container terminal via docker exec -it winccoa bash, perform your tasks, and exit without stopping the container or losing state.
Note on configuration using a .env file: The script checks if a .env file exists in its directory and loads its environment variables (using set -a and source). This allows you to easily customize variables such as CONTAINER_NAME, WCC_OA_IMAGE, or WCC_OA_VERSION without having to modify the shell script itself.
WinCC OA relies on graphical interfaces for project management and engineering. The script passes your host’s DISPLAY environment variable and network configuration to the container so that X11 applications can render on your host screen.
However, X11 security will block the container from connecting by default. To authorize the container, you must run the following command in a terminal session on your host machine before starting GUI tools:
xhost +
Once authorized, you can run commands like startPA inside the container, and the Project Manager window will appear on your desktop as if it were running natively.
Summary
Running WinCC OA in a container gives you a clean, isolated environment for SCADA development. Volume mapping keeps your code safe on the host machine, and X11 forwarding gives you access to the full suite of graphical development tools without the overhead of a virtual machine.
We just added a simple scripting feature to MonsterMQ.com.
Instead of building a MonsterMQ workflow for every small transformation, you can now create simple JavaScript scripts that run directly in the broker. For many use cases, that is much easier: subscribe to one or more input topics, process the data, publish the result.
And it goes beyond MQTT topics: scripts can also use database connections to read and write data directly from PostgreSQL, MySQL, Neo4J, making it possible to enrich, correlate, or persist data directly.
There is also AI generation support built in. Just describe what you want, for example: “take the JSON payload of the trigger topic and publish every single JSON item to a separate topic on output/expand/<item>” and the script gets generated for you.
Personally, I think this makes the MonsterMQ workflows unnecessary. For a lot of broker-side automation, a small script is simpler and easier to understand, especially when AI can help generate it.
A new experimental feature has landed in MonsterMQ: It is acting now as a Kafka Broker, so a Kafka Client can subscribe (and publish, if allowed) to streams. Streams are mapped to MQTT topics. So MQTT topic value changes are going into those streams.
Before anyone asks: No, this is not a replacement for Apache Kafka. 🙂
The queueing is currently backed by databases such as PostgreSQL, MongoDB, and SQLite, so it won’t compete with Kafka in terms of throughput and scalability.
But for many smaller and medium-sized use cases, it brings streaming concepts directly into the broker:
🔹 MQTT and Kafka-style messaging in one server
🔹 Persistent queues stored in a database
🔹 Simple deployment without additional infrastructure
🔹 Easy integration with the existing MonsterMQ ecosystem
As always, this is a first draft – not yet in the version or docker image!
👉 “When will we get a command-line tool for WinCC OA?”
The discussion was around MCP Servers, AI, and how well LLMs can work with command-line tools. Building a CLI for WinCC OA had already been on my mind for quite some time. But hearing it directly from a customer pushed me to finally start.
As a first step, I created a Rust API for WinCC OA. Partly for the Rust fans out there, and partly because, to be honest, I personally prefer Rust over C++ (Caleb Eastman).
Based on that API, I’ve now built a first version of a WinCC OA CLI tool.
🎥 Check out the video and let me know:
What commands would you like to see in a WinCC OA CLI?
Für die, die es schon immer wissen wollten: Ich hatte es nicht im Netz gefunden, daher habe ich die Temperaturen beim Resch&Frisch Ofen selber gemessen. Hier sind die Programme und die dazugehörigen Gradzahlen:

Programm	Temperatur
Programm 1	125° / 130°
Programm 2	190°
Programm 3	180°
Programm 4	170°
Programm 6	160°
Programm 7	160°
Programm 12	240°
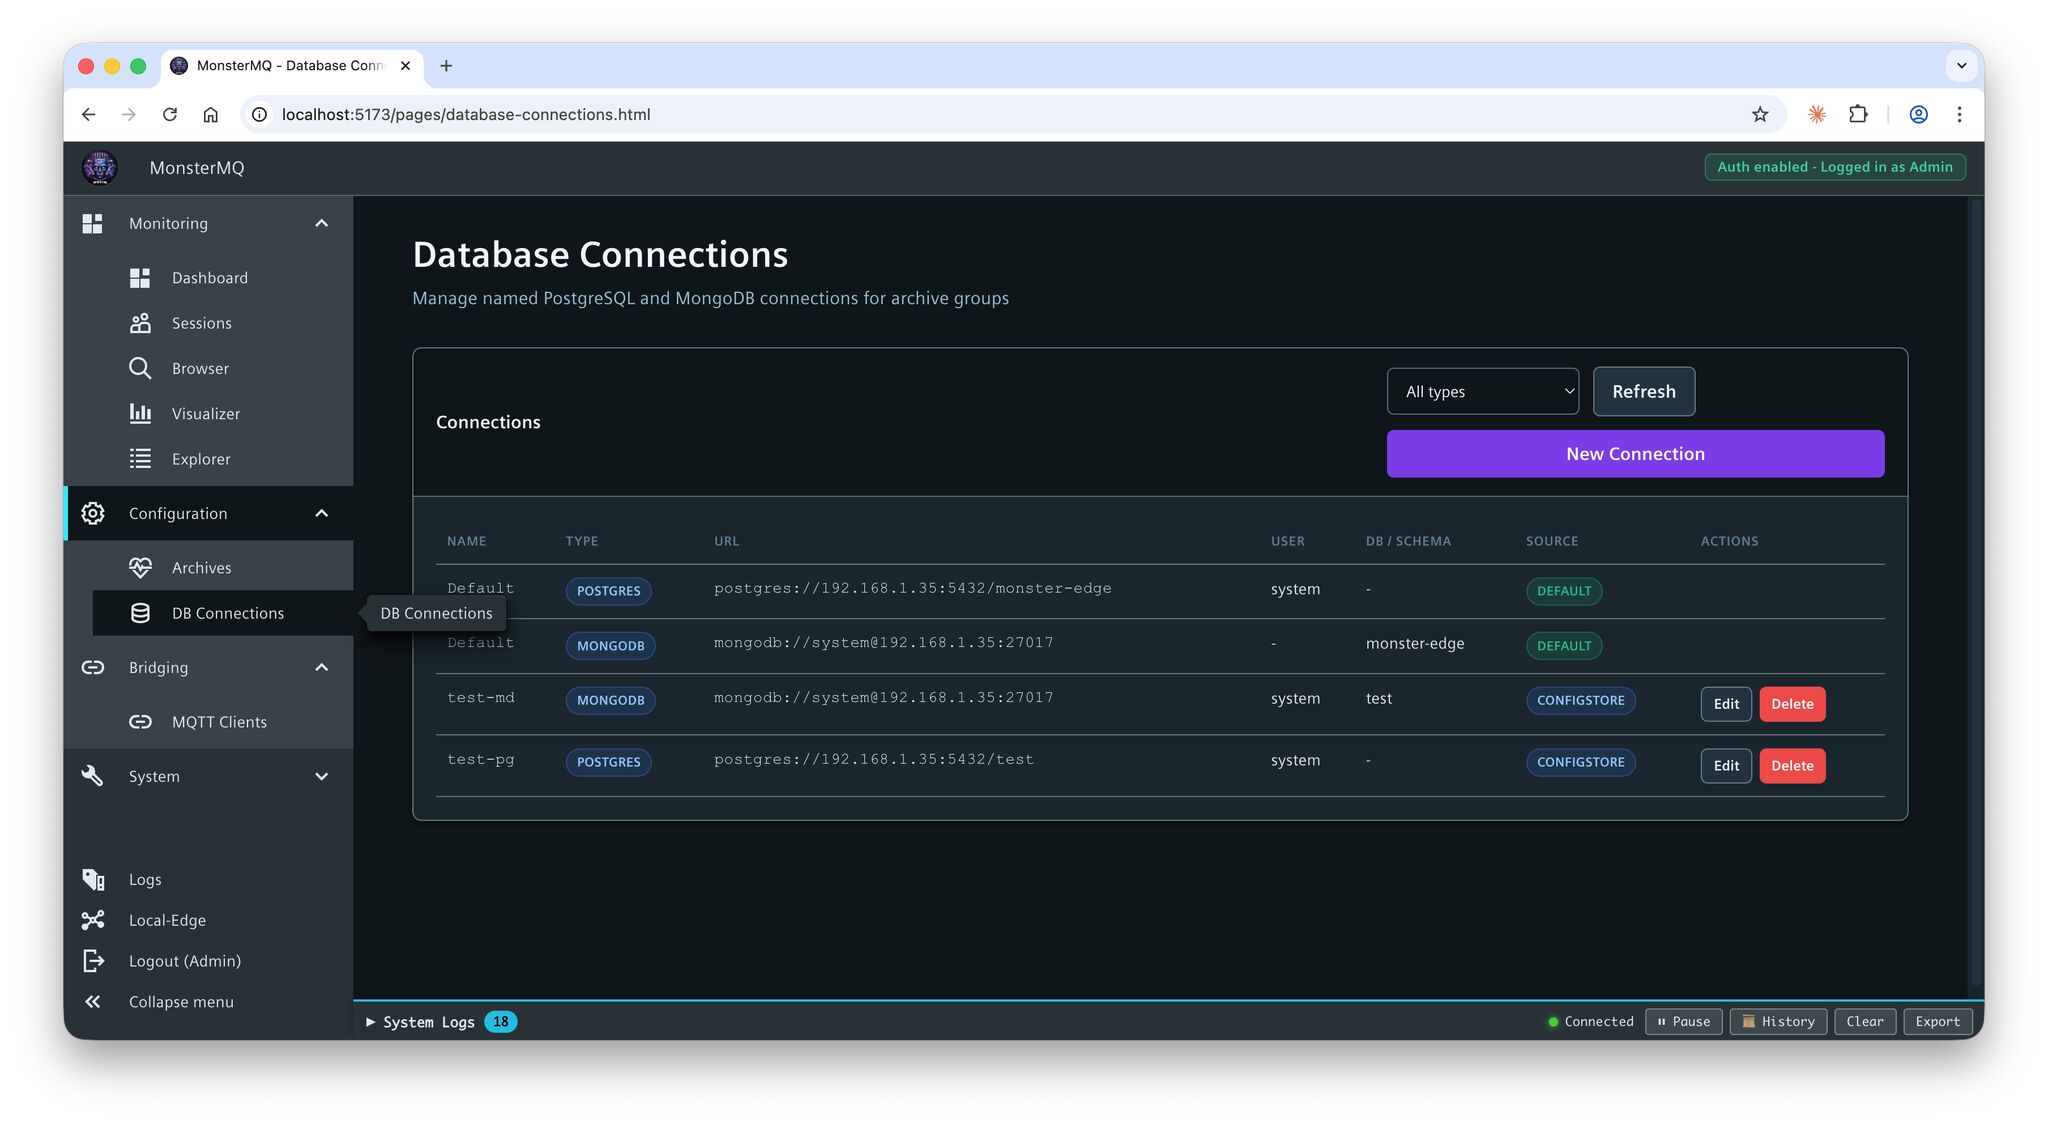
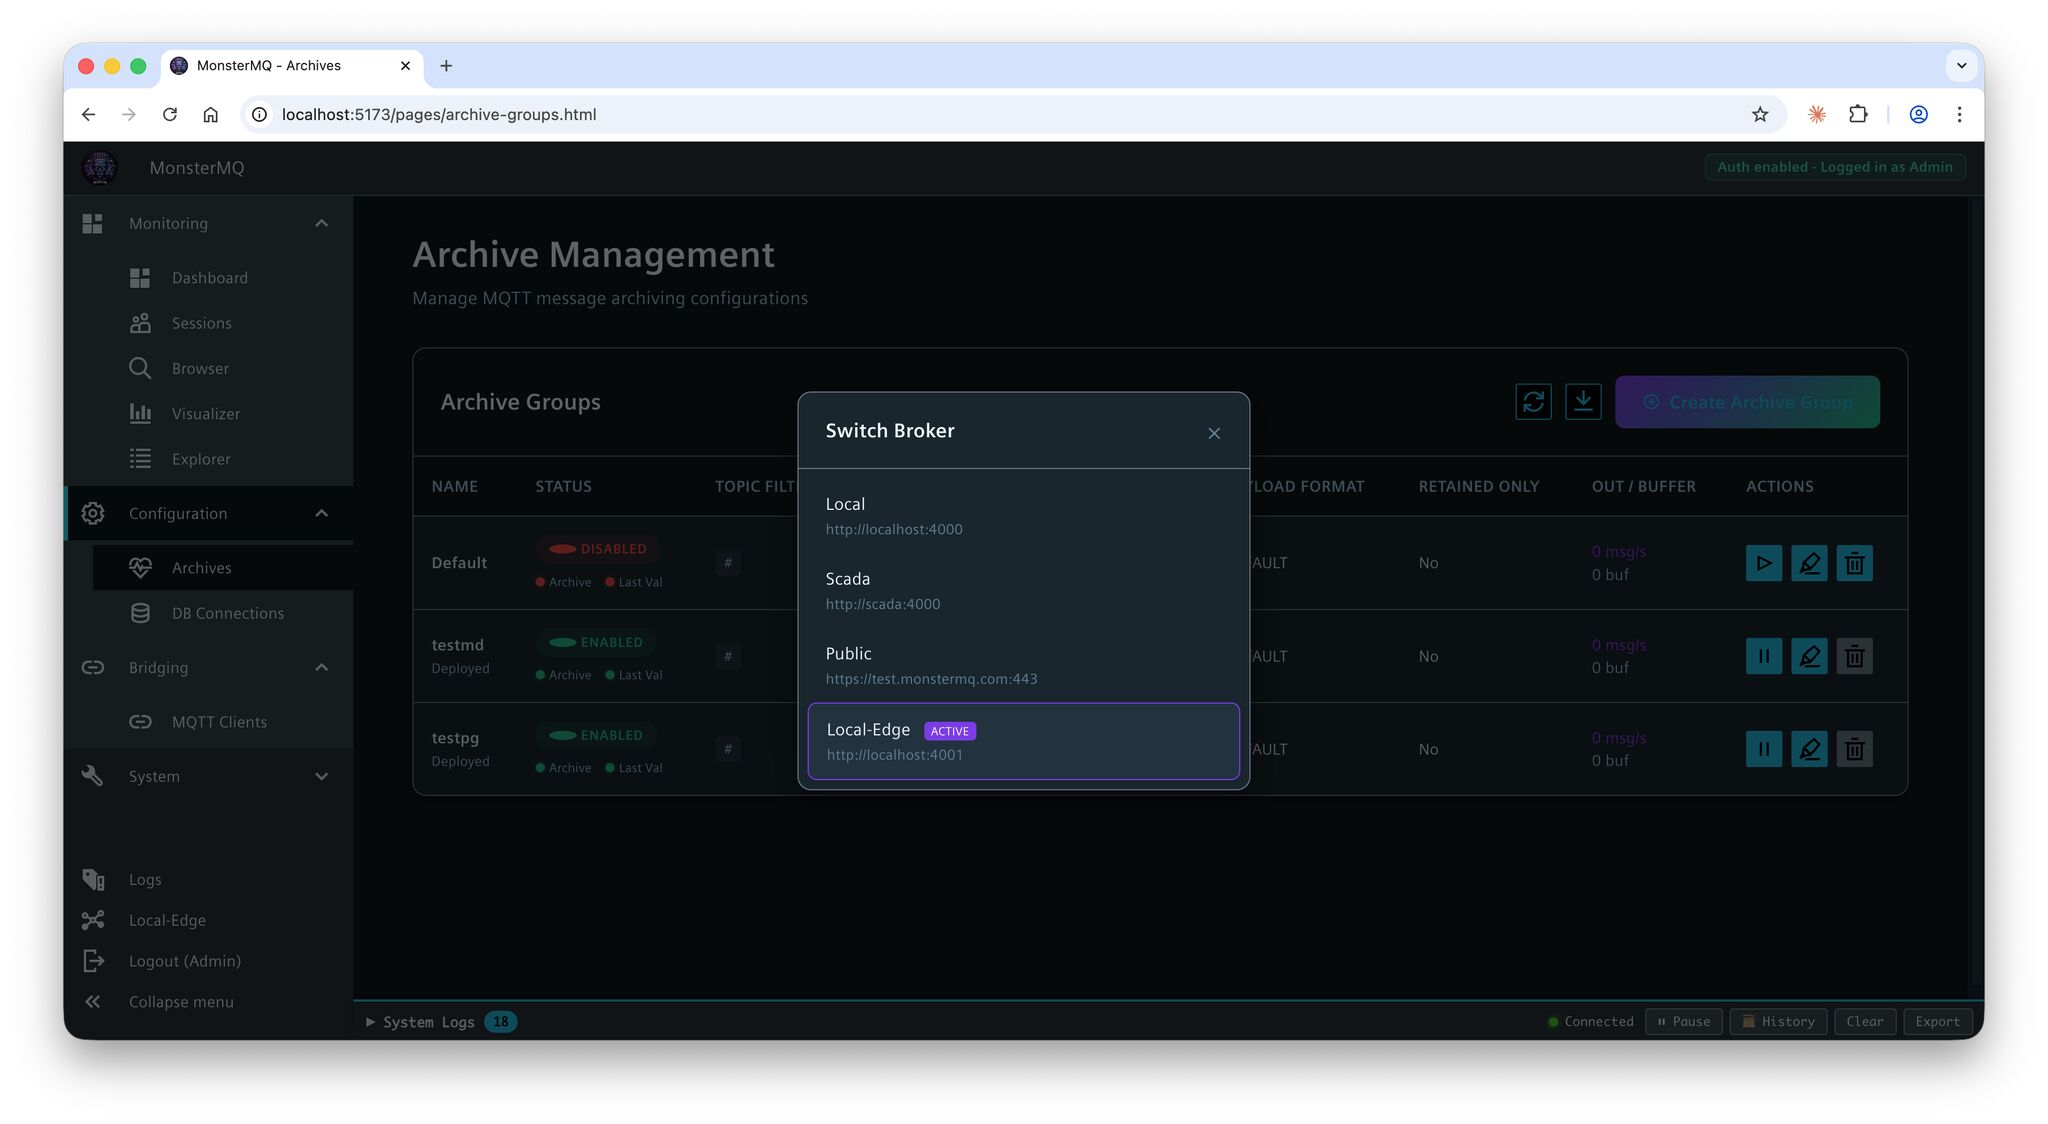
Database connections for archives can now be configured at runtime directly in the dashboard – no restart needed.
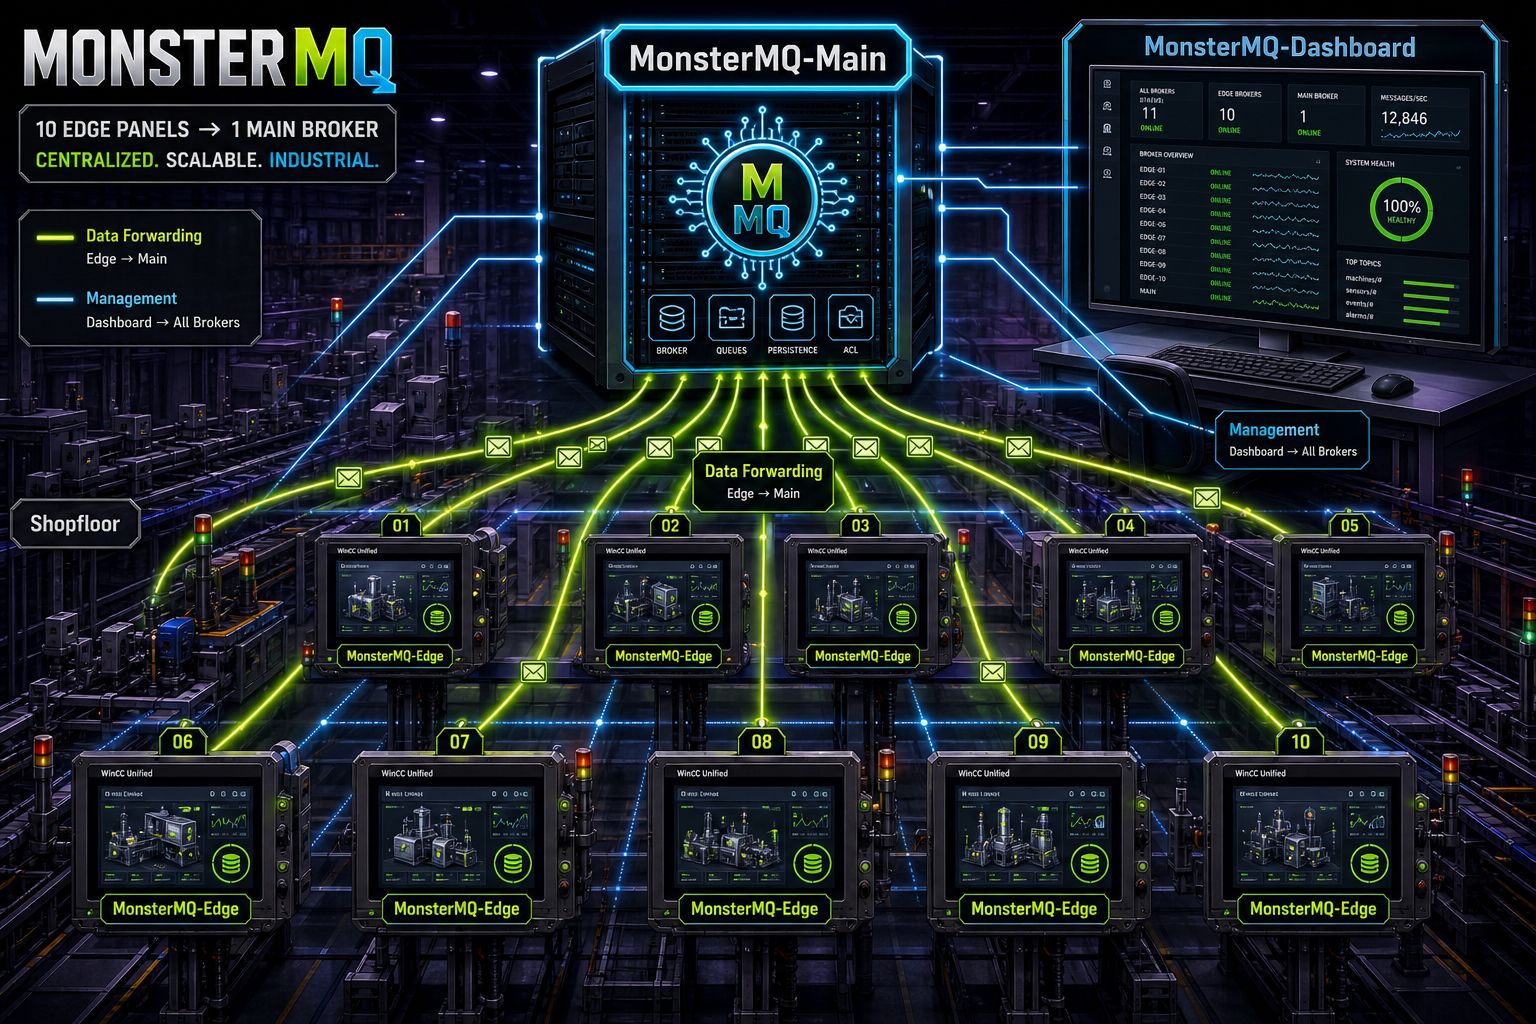
👉 This is especially important for MonsterMQ-Edge running on a Unified Comfort Panel – you can now configure archiving online, without touching the panel (MMQ config file).
The result: your data from WinCC Unified Panels can be easily archived centrally to PostgreSQL or MongoDB, configured and managed remotely.
Or forward the data to a central full MonsterMQ instances to collect the data from all your panels.
And here’s the bigger picture: MonsterMQ and MonsterMQ-Edge share the same dashboard, same GraphQL interface. One central place to manage both – from the full broker down to the tiny monster running on your panel. 😅
Let me know if you want it as an Edge App, which can be deployed on the Panel. But remember: you need an Edge License to run Edge on the Panel.
MonsterMQ-Edge still has limited functionality compared to the full broker – but it’s growing.