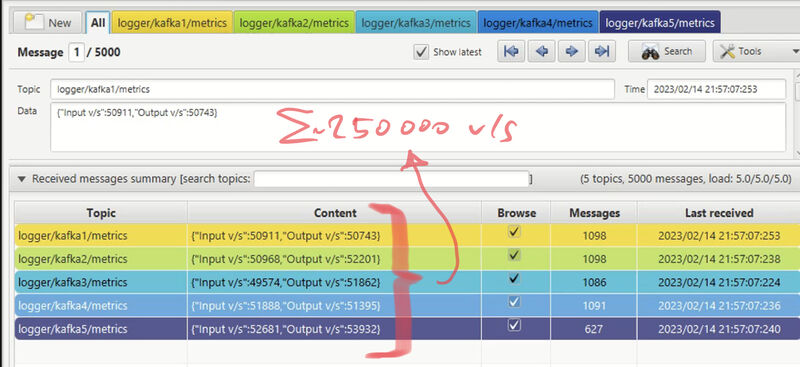
Did a test with one gateway and collected 250000 😲 value changes per second(!) from 10 OPC UA servers and wrote it to 10 topics on a single Kafka Broker… Kafka was bored 😴… one and a half core of an i7 PC. The gateway had a lot of work to do, collect and bulk all the single values and then send it to Kafka … roughly 10 cores of an i7 PC.
The gateway has a GraphQL and MQTT interface where you can read and write OPC UA values. On an internal MQTT topic the logger publishes how many values are getting in and out…
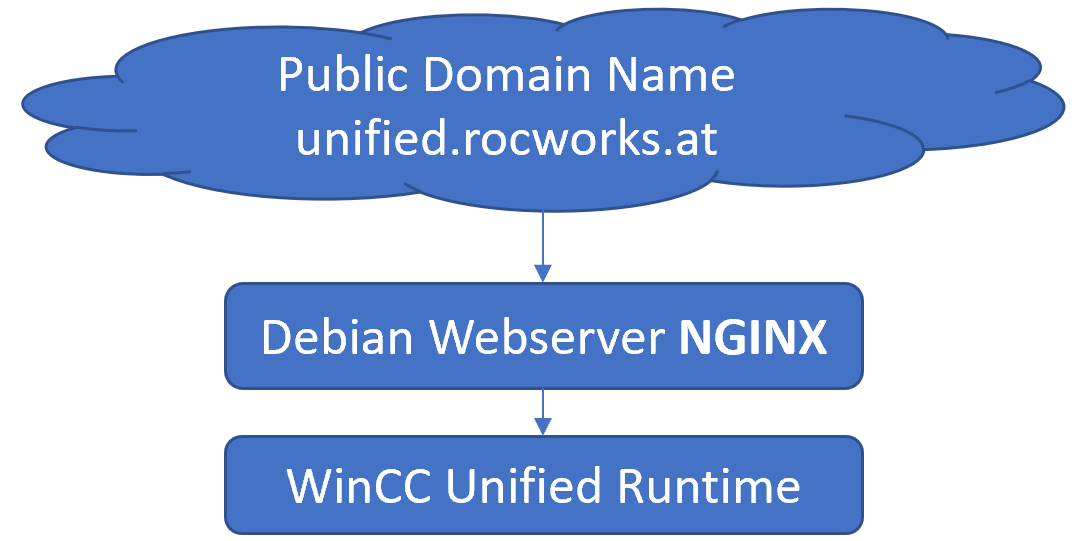
This article will show how WinCC Unified can be accessed through a public available server in the internet.
Disclaimer: I only did this for testing and demo purposes!!!
First you need to have a public domain name and a public accessible host. Or a host running somewhere in the cloud and you will get a IP and/or an URL, which will point to your host. In my case I have a public IP address from my internet provider and my public sub domain name points to my server at home.
My registered public domain name is rocworks.at. Additionally I have used a sub-domain name unified.rocworks.at. Because I have multiple services running on my machine at home. With the subdomain the service can be easily be distinguished. At my internet provider I have configured a DDNS services, so that my subdomain unified.rocworks.at points to my IP at home. You can also use other DDNS services (noip.com) , also if you have a dynamic IP address.
If you have it running at home, then you have to setup a port forwarding from your modem to your web server IP at home.
At the WinCC Unified Runtime Host we have to change some settings in files, to set the right public URL for the identity provider (UMC). After doing this, you should reboot the computer.
Config.level (C:\Program Files\Siemens\Automation\WinCCUnified\config)

	[IdentityProvider]
	Url = "https://unified.rocworks.at/umc-sso/"

Web.config (C:\Program Files\Siemens\Automation\WinCCUnified\WebRH)

	<appSettings>
	    <add key="appvirtdir" value="/WebRH" />
	    <add key="origins" value="https://unified.rocworks.at" />
	  </appSettings>

Config.json (C:\Program Files\Siemens\Automation\WinCCUnified\SimaticUA)

        "dnsname": "unified.rocworks.at"

Umcd.cfg (C:\Program Files\Siemens\LocalUserManagement\etc)

	Search and replace hostnames

HKEY_LOCAL_MACHINE\SOFTWARE\Siemens\User Management\WebUI\Settings

        ipaddress = "https://unified.rocworks.at/umc-sso/"

Note: instead of "unified.rocworks.at" use your public domain name.
At the web server at home I have NGINX running in a Docker Container together with Let’s Encrypt. With Let’s Encrypt and Certbot we can get valid Certificates for our Webserver. But that’s another story. Here is a docker-compose.yml file for NGINX and Let’s Encrypt:
First you need WinCC Unified V18 with the GraphQL Server. The GraphQL server comes out of the box with the new version and should be up and running automatically when you download and start your runtime. You should see a process “WCCILgraphQLServer.exe” in your task manager.
In Unity you have to create a project and download the GraphQL for Unity Pro Asset in the Package Manager.
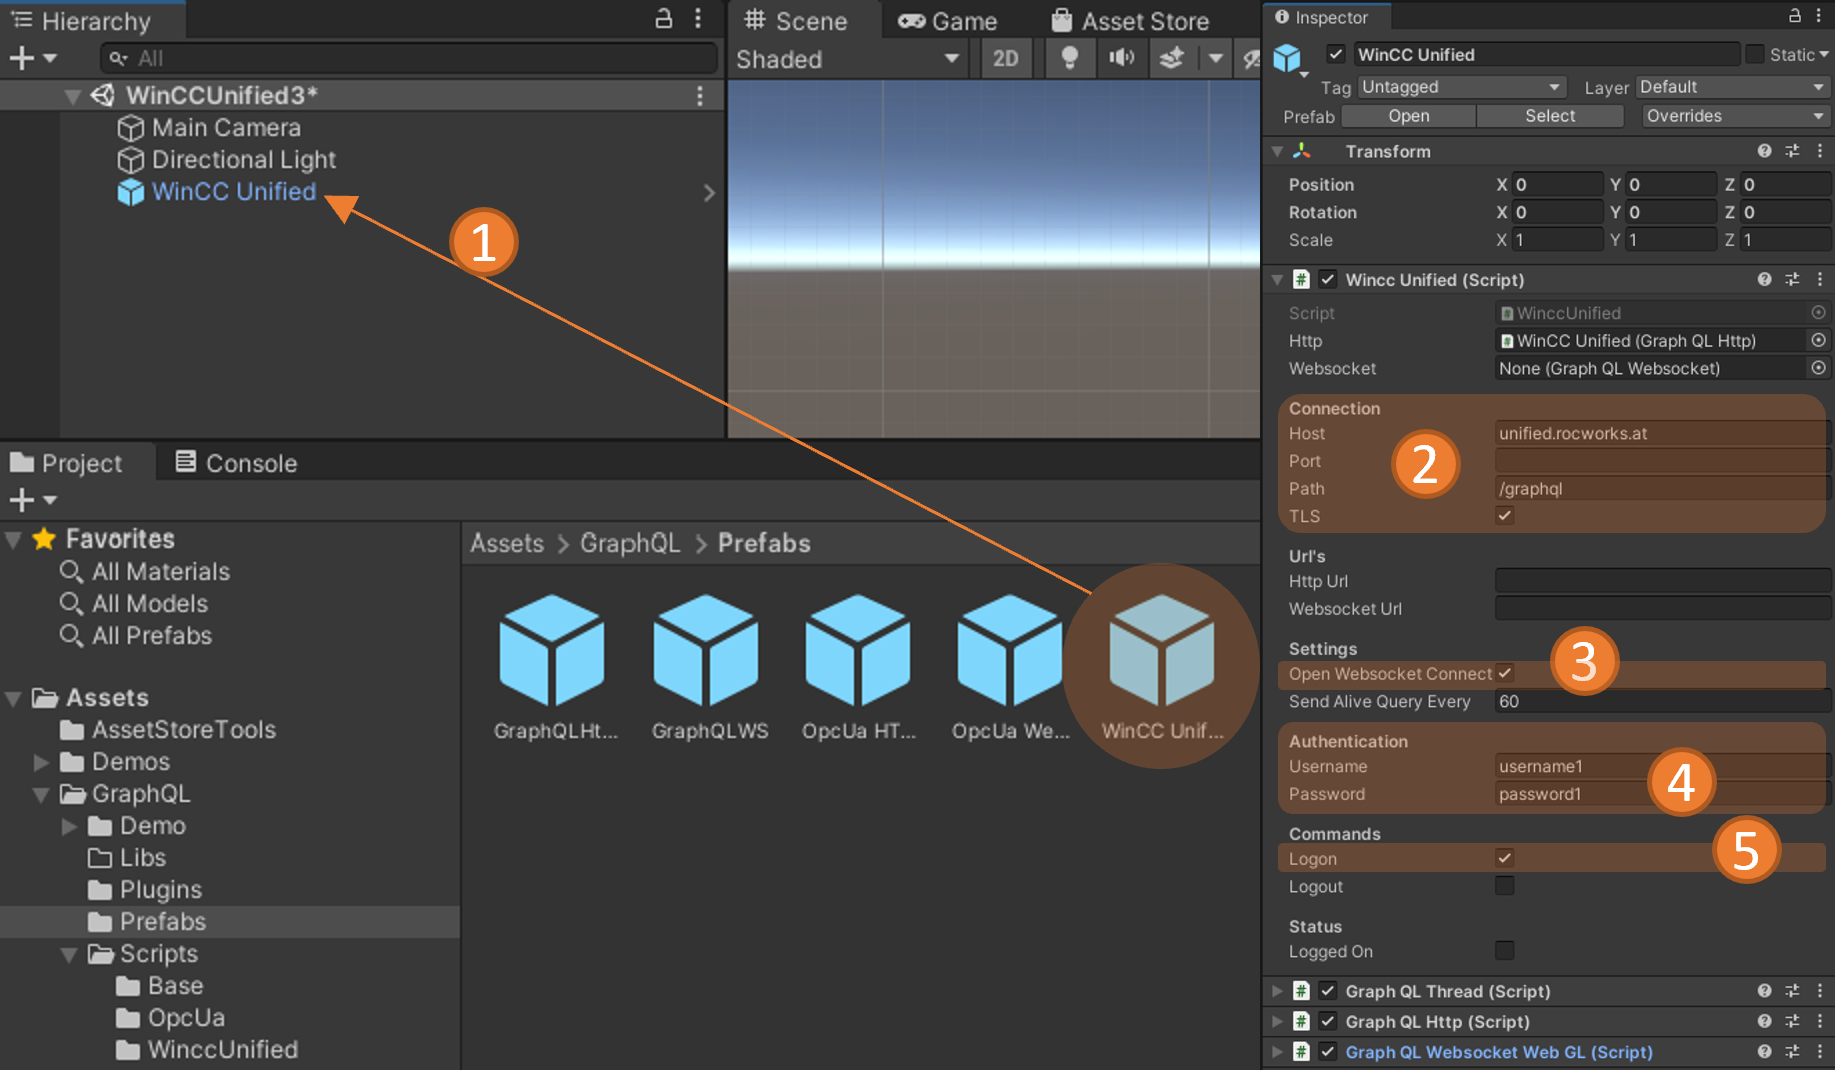
Prefab: Drag and drop the WinCC Unified Prefab from the Prefabs folder into your scene.
Connection: In the properties you have to set your GraphQL Host, optionally the port, the path (typically /graphql), and if you want to have a secured TLS connection (HTTPS, WSS).
Websocket: If you want to subscribe to tag value changes, then you have to open additionally a Websocketconnection. Without the Websocket connection you can still read and write tag values, but a subscription to tag value changes is not possible.
Authorization: Set the username and password to connect to WinCC Unified (at the time of writing, this user must have the role HMI Administrator).
Logon: Check the “Logon” checkbox, if you want to start the connection at startup (you can also set this “on-demand” during runtime in your code.
Then you can already start the project in the editor to see if the connection can be established. If everything works fine, then the “Logged On” property turns to checked.
Now you can create your own C# script and read/write/subscribe tag values in an easy way in C# scripting. In that case I have simple added the script as additional component to the WinCC Unified GameObject (Prefab).
using System;
using System.Collections;
using System.Collections.Generic;
using UnityEngine;
using GraphQLWinccUnified;
using Newtonsoft.Json.Linq;

public class WinccUnified3 : MonoBehaviour
{
    private WinccUnified _connection;
    private bool _ready;

    // Start is called before the first frame update
    void Start()
    {
        _connection = GetComponent<WinccUnified>();
    }

    // Update is called once per frame
    async void Update()
    {
        if (!_ready && _connection.IsWebsocketReady())
        {
            _ready = true;

            // SubscribeTagValues
            _connection.SubscribeTagValues(
                new string[] { "HMI_String_1" },
                data => { Debug.Log(data.GetValue<string>()); });

            // WriteTagValues
            await _connection.WriteTagValues(
                new string[] { "HMI_String_1" },
                new JValue[] { new JValue("Hello World!") },
                new DateTime[] { DateTime.Now });

            // ReadTagValues
            var result = await _connection.ReadTagValues(
                new string[] { "HMI_String_1" });
            Debug.Log(result[0].GetValue<string>());
        }
    }
}
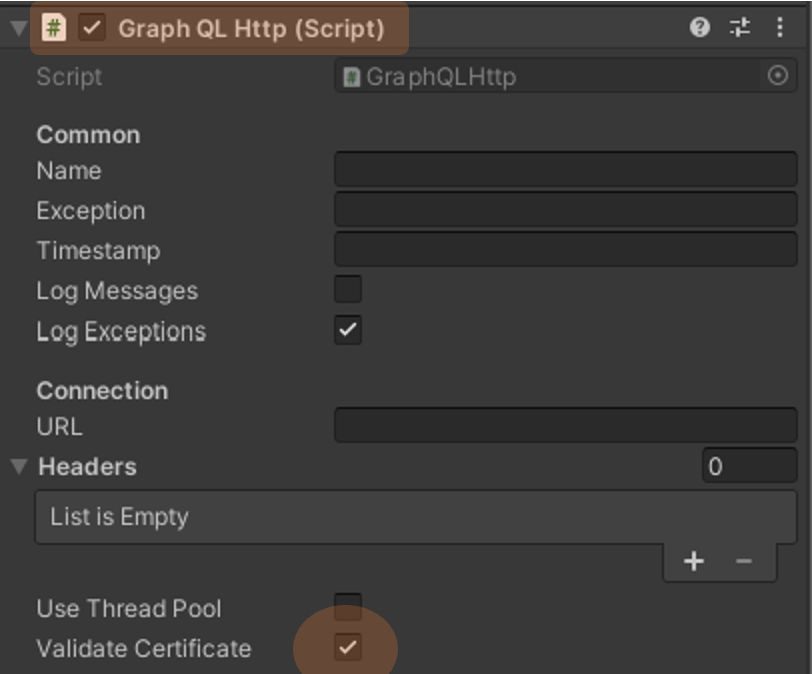
If you deal with with a self-signed certificate, then you must uncheck “Validate Certificate” at the “Graph QL Http” Component. But the Websocket connection in Unity does not yet support self-signed certificates. So, it is better to use an insecure connection. Typically the GraphQL port is 4000, so be sure to set the Port to 4000. And don’t forget to open the firewall for that port on the host where the Unified runtime is running.
With the GraphQL Server in WinCC Unified V18 we can now integrate various (IT) data platforms with simple programs. Those programs can be written in Python, Java, Kotlin, Go, JavaScript, or whatever kind of programming language you prefer.
In my case I have used Kotlin to implement a simple Apache KafkaConsumer, which maps and writes values from my Home-Automation to the WinCC Unified SCADA system.
I can now use WinCC Unified for visualisation, even if I don’t have any PLC at home. WinCC Unified can be used as a Low- or No-Code platform to create fancy Web-Based visualisations with real-timevalues from any kind of data source.
WinCC Unified also has great alarming features. Alarm handling can be done in WinCC Unified and alerts could also be published back to the streaming platform with a producer.
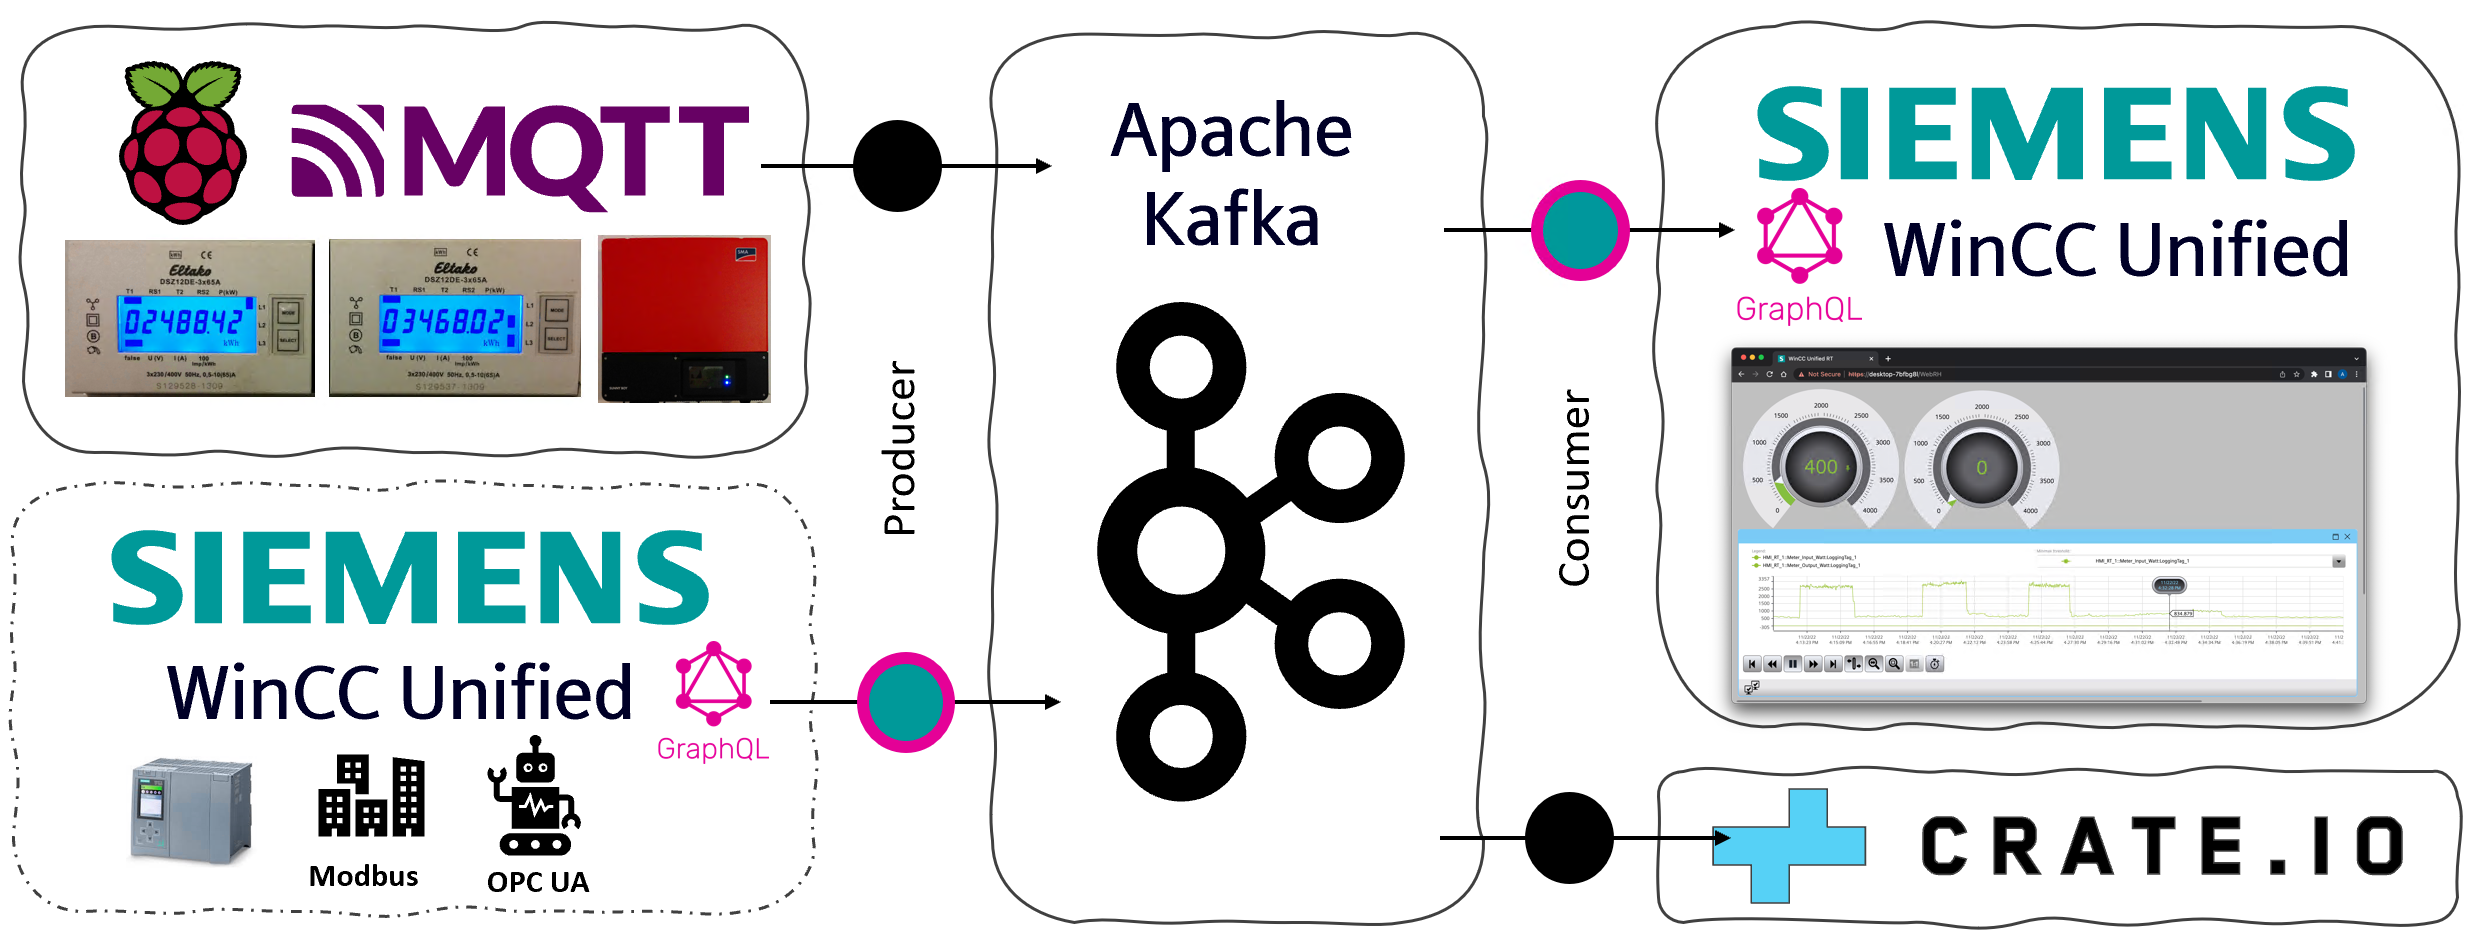
I collect my Home-Automation values from a Raspberry Pi, which reads values from power meters, temperature sensors, or data via Bluetooth from my PV Converter. The values are published to a MQTT Broker. And from that MQTT Broker I bring my values to Apache Kafka and then to the WinCC Unified system.
With the GraphQL Server of WinCC Unified it would also be easily possible to implement an Apache Kafka Producer, so that values from PLC’s can easily be published to Apache Kafka, or any other data streaming platform.
From Apache Kafka I write my values to WinCC Unified and additionally to a CrateDB. CrateDB is a great NoSQL database with the power of SQL and it is highly scalable. It can be used for data analytics, machine learning, Grafana Dashboard, and more…
For sure you can also grab the data directly from the MQTT broker and bring it directly into WinCC Unified via the GraphQL Server without a streaming platform, but a streaming platform has additional benefits, which are not covered in this post…
If you want to use the Cognito User Pool, then you first have to get somehow the JSON Web Token (jwt). Once you have this token, then you should pass the token in the header within the “Authorization” key.
graphQLHttp.Headers = new List<Header>()
{
      new Header() {Key = “Authorization”, Value = userSessionCache.getIdToken()}
}
Here you will find more information about jwt tokens.
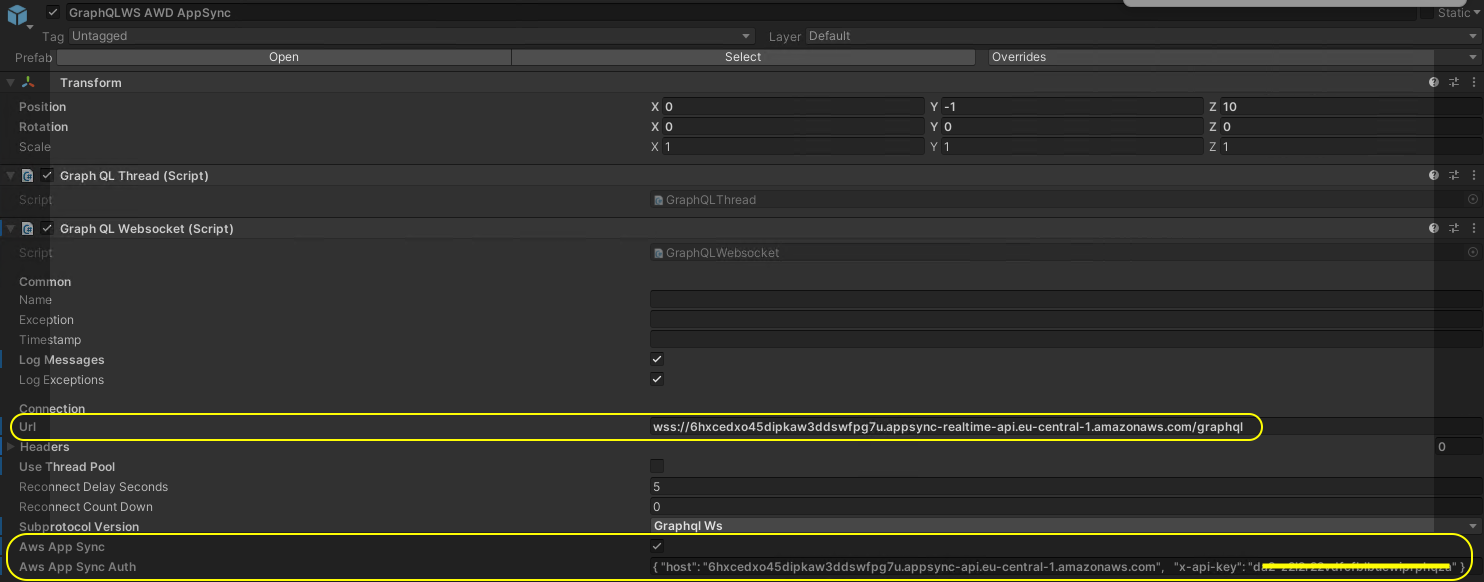
The Asset GraphQL for Unity version 1.5.2 works now with AWS AppSync realtime Websocket connections. You can now subscribe to real-time value changes via a GraphQL Websocket connection with AWS AppSync. This was not possible before, because AWS has implemented it’s own specific protocol which is a little bit different to the Apollo Websocket protocol.
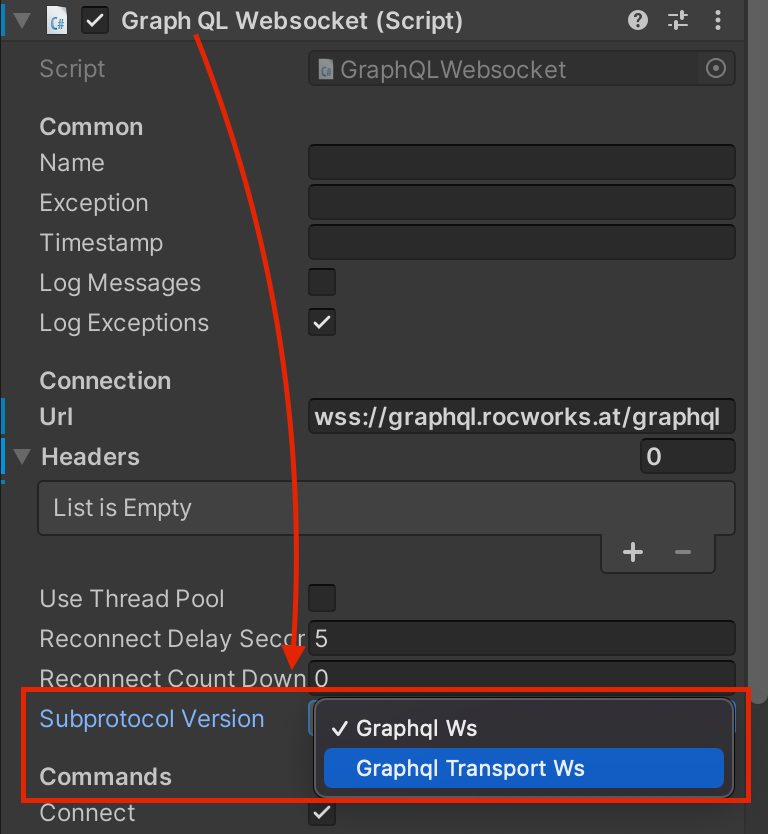
The new version of GraphQL for Unity now supports the Apollo GraphQL Websocket Subprotocol “graphql_transport_ws”. So, it is now compatible with the Apollo 3.0 server, which does not support the former “graphql_ws” subprotocol anymore.
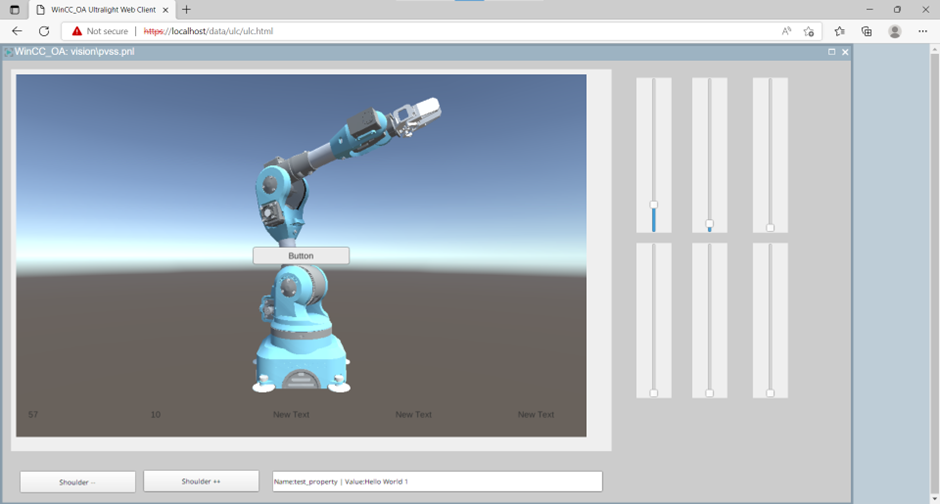
This article is about integrating your 3D Unity applications into WinCC Open Architecture SCADA HMI Web screens and exchanging property values. It only works with the WinCC Ultralight Web Client. Because the native Ui does not support WebGL in the WebView Widget. Update: It should also work in the native Ui, you just have to set the environment variable: QTWEBENGINE_CHROMIUM_FLAGS=–enable-gpu
With this free Unity Asset you can create a Unity application with an interface to the SCADA system in an easy way. Don’t be confused about the name of the Asset “WinCC Unified Custom Web Control”. This is because initially it was build to create Custom Web Controls for WinCC Unified only. But there is now also an option to create a build of your Unity application for WinCC Open Architecture.
First create and build your Unity Application as described in the documentation of the Asset. You may also watch this video.
Just at the end execute the menu item to create a WinCC Open Architecture application, instead of WinCC Unified.
Create and load the WebView
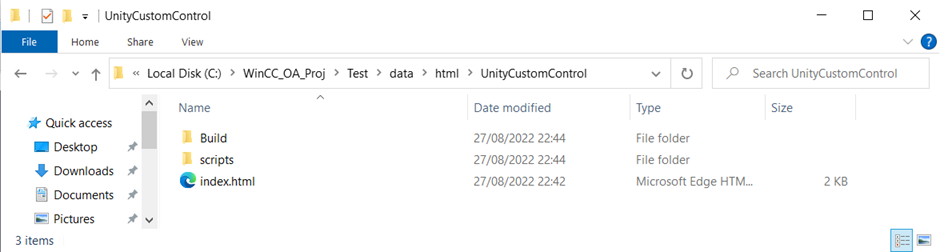
Then copy the ZIP file to your WinCC OA project into the folder “data\html” and unzip the ZIP (for example C:\WinCC_OA_Proj\Test\data\html\UnityCustomControl).
In this tutorial our application is named “UnityCustomControl”. You have to replace this with the name of your Unity application.
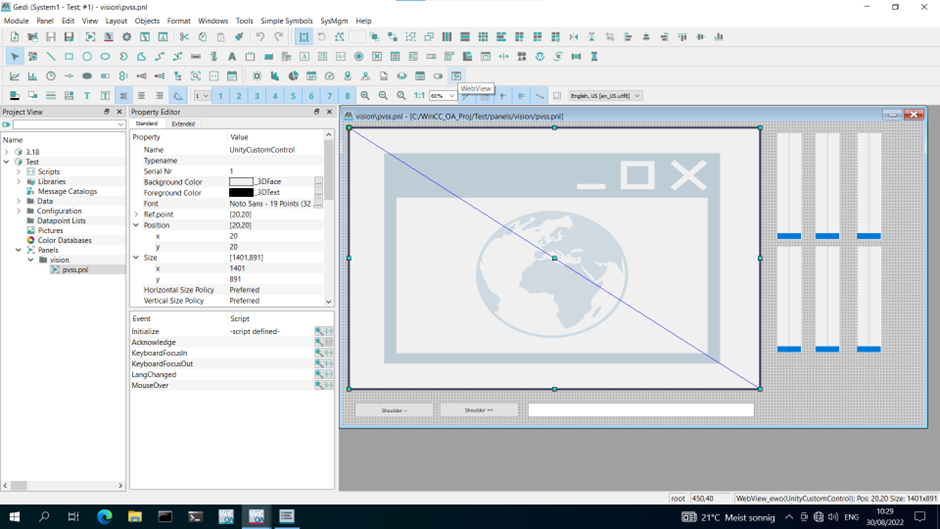
Then you must insert a WebView into your screen.
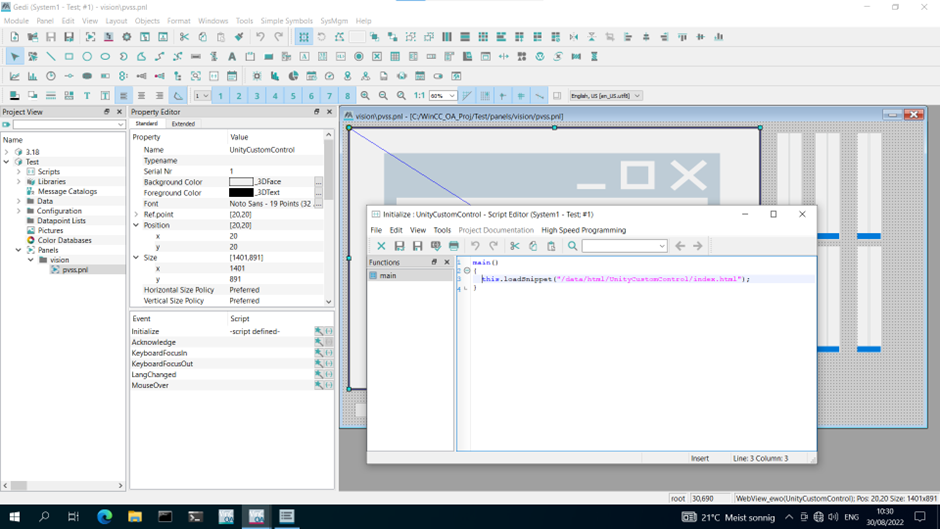
And then you must load the generated Unity application in the Initialize script of the widget.
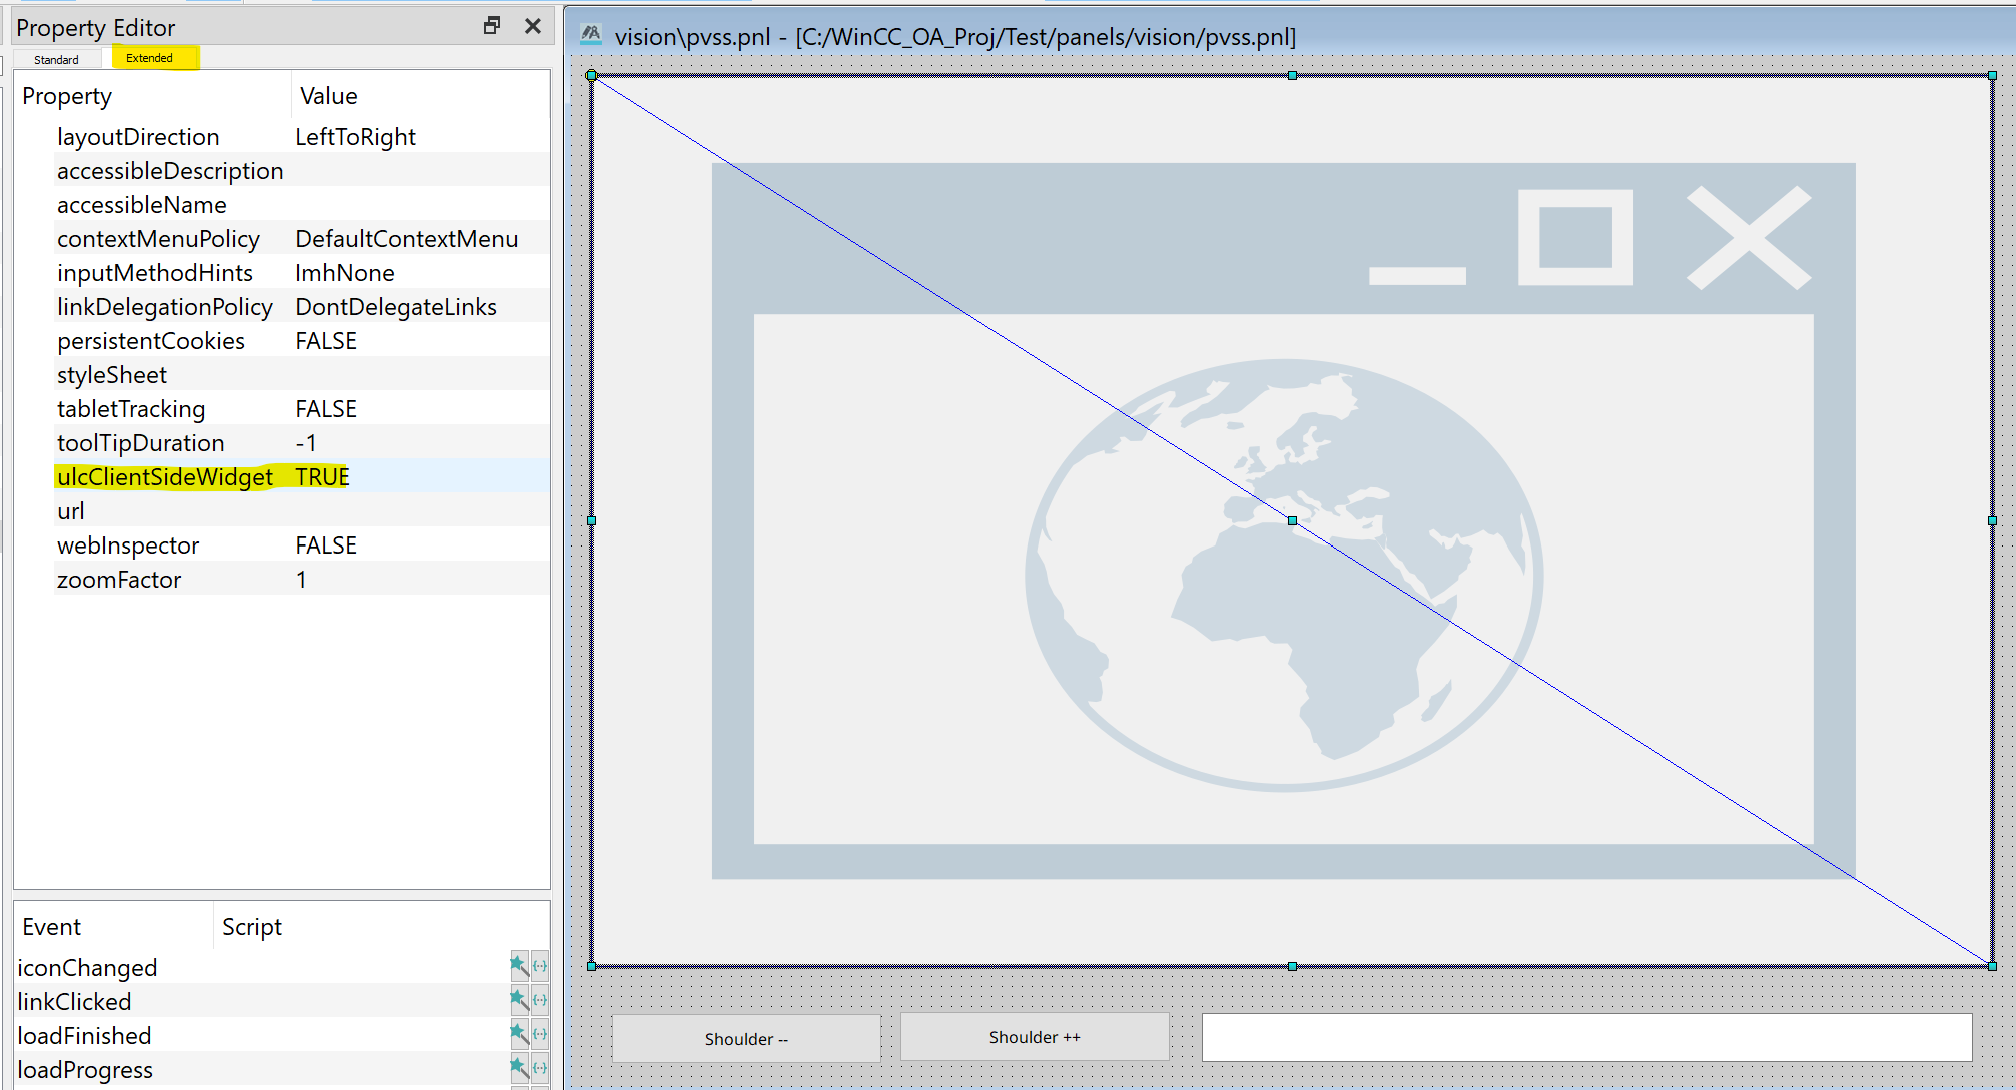
In the Property Editor at the Extended tab be sure to set the “ulcClientSideWidget” to TRUE.
Set and receive property values
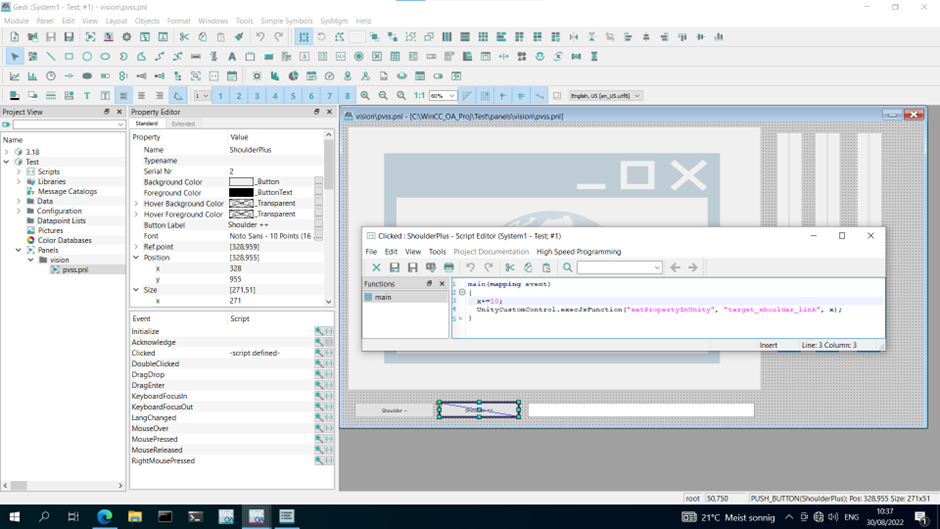
To send values from your WinCC Open Architecture to the Unity application you must use execJsFunction of the Webview and call the “setPropertyInUnity” function with the property and the value which you want to set. See the following example.
“UnityCustomControl” is the name of our Webview Widget! It’s up to you how you name it.
At the WebView there is an event “messageReceived”. There you will get all the messages which are sent from Unity to WinCC Open Architecture. See the example for the structure of the parameter. It is always a JSON document which contains the Name and the Value of the property which has been sent.
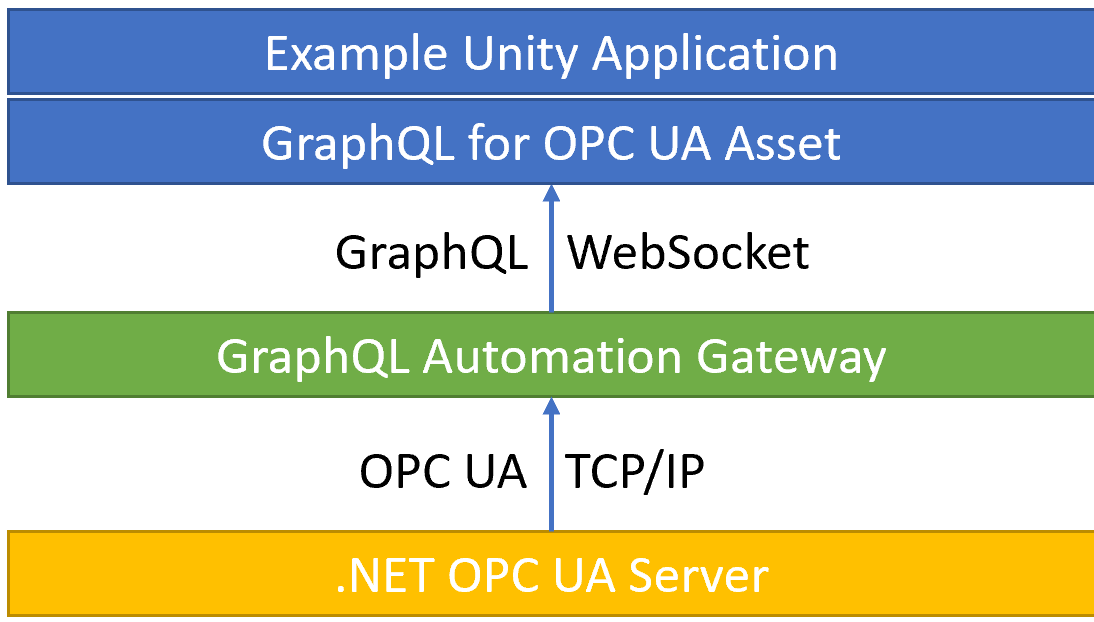
In a simple setup I have tested to send 2000 value changes per second from an OPC UA server to Unity with GraphQL, the Open-Source Frankenstein Automation Gateway, and the GraphQL for Unity Asset. And it could go up to 10000 value changes per second…
I had one DotNet OPC UA server with a lot of simulated tags with random data. The .Net OPC UA server is the DotNet reference implementation from the OPCFoundation, which can be found here.
On top of that the Open-Source Frankenstein Automation Gateway for GraphQL was running. It is connected to the OPC UA server. It offers a GraphQL interface to the tags of one or more connected OPC UA servers.
In Unity I had used the GraphQL for OPC UA Asset to easily connect to the Gateway, browse the tags, and subscribe to the value changes of 100 tags.
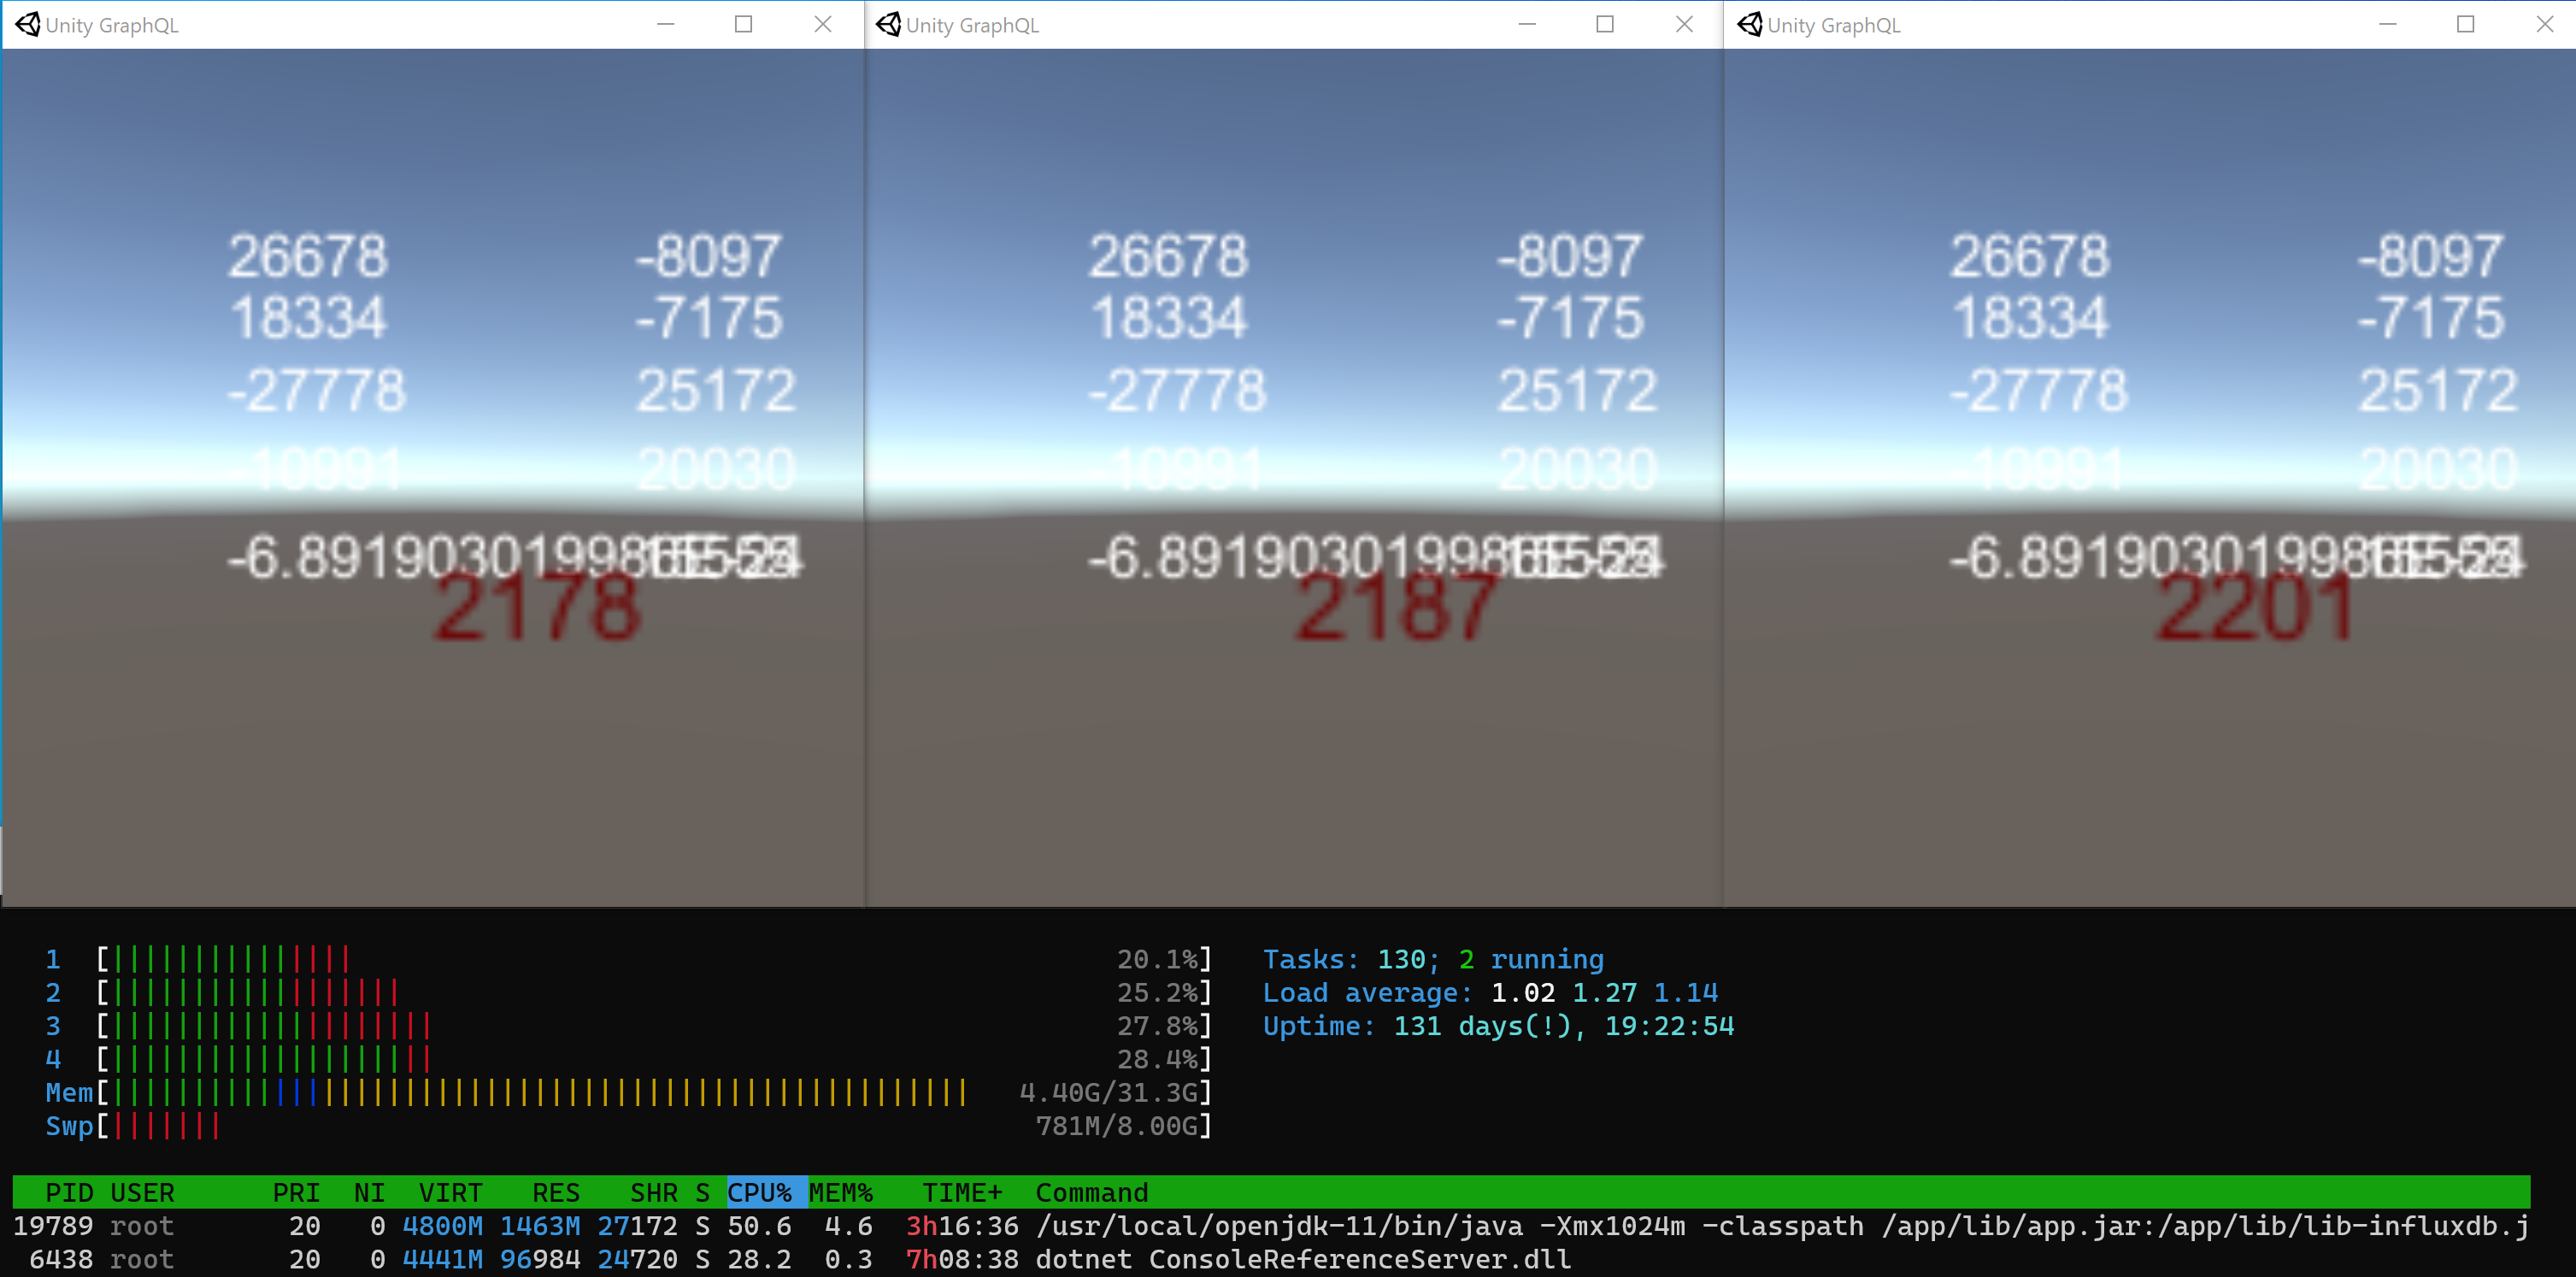
Each tag was changed by the OPC UA server every 45ms. This ends up in a bit more than 2000 value changes per seconds, which were sent from the OPC UA server to the Unity Application.
Here we see the Application running 3 times on my Laptop with an Intel(R) Core(TM) i7-9850H CPU @ 2.60GHz. In the center you see the amount of incoming value changes per second (red number). Around that number, we see some of the values coming in from OPC UA. At the bottom we see the CPU load of the Frankenstein Automation Gateway (java program) and the OPC UA DotNet Server. Both were running on an old Intel(R) Core(TM) i3-6100U CPU @ 2.30GHz.
It was also possible to increase to load up to 10000 value changes per seconds! Sending 100 values every 10ms from OPC UA to Unity…
There is a free Unity asset to simplify the creation of an WinCC Unified Custom Web Control out of an Unity3d application. So, with that you can easily build WinCCUnified screens with real time 3d content built with Unity.